

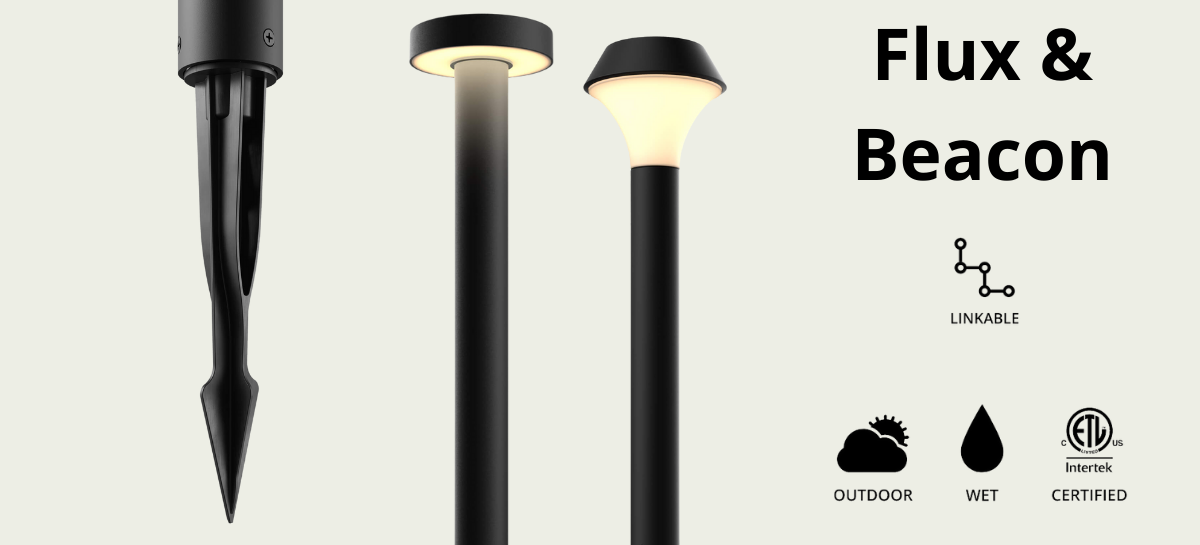
See your home or business in a new light with these landscape lighting tips from DALS Lighting! Back in the spring, DALS released their line of new LED landscape fixtures – available at PROLIGHTING. Using their integrated LED spot lights, path lights, and bollards, we’ll show you how to create a low-voltage landscape lighting plan of your own — just in time for summer.
Every low-voltage landscape lighting plan will consist of three main components:
1. Low-Voltage Transformer
A low-voltage transformer is the power supply for your landscape lighting system. The transformer is usually mounted near or on the house or commercial building, and plugs into a standard outdoor-rated GFCI electrical outlet. DALS Tip: Avoid mounting the transformer in shady areas, as this could interfere with ‘dusk-to-dawn’ photoelectric cells. It should also be installed at least 36″ (3 feet) off the ground.
2. Landscape Lighting Fixtures
This is the fun part — choosing fixtures. As we mentioned, we’re using DALS new line of integrated LED spot lights, path lights, and bollards, which will be powered by the transformer. Don’t be afraid to mix it up! Different types of fixtures can be connected together. Path lights: These fixtures aren’t limited to paths. When mounted in gardens and flower beds, they provide a subtle glow that lights a small surrounding area of plants, rock, or mulch. Spot lights: Use spotlights to make trees, plants, shrubbery, or other architectural features of your space stand out. Bollards: Use these lights to enhance the look of your yard while making walkways obvious at night. DALS Tip: When you choose fixtures, add up the total wattage they consume. You’ll need this number for deciding on other parts of your landscape lighting system.
3. Landscape Lighting Wire
You’ll need wire to connect your transformer to your light fixtures. Landscape lighting wire is rated according to the size of its conductor (gauge). Selecting the right wire size is important and will prevent any issues down the road. For example: a 12-gauge wire is larger and can handle more wattage than a 14-gauge wire.

Steps for an LED Landscape Lighting Installation
First, you’ll need to map out a plan. DALS suggests starting your layout by making a sketch of your property. Being accurate with your dimensions will help estimate distances for your wire runs. Try sketching and measuring as you walk around your property marking where each fixture will be placed.
From there, mark your fixture locations with small flags and indicate their placement on your sketch. Be precise about distances between fixtures and write them down on your layout.

Next, choose your power supply. To figure out which power supply is best, there are two things to consider: the total wattage of the fixtures you’ll be purchasing, and if you anticipate adding more fixtures in the future. When you add up the wattage of all your lights, you’ll have a good idea of how powerful your transformer needs to be. DALS Tip: the total wattage of you lights should be 20 percent less than the transformer’s rated wattage. Once you’ve selected the right transformer, the best placement is usually next to your house or commercial building, as close as possible to the fixtures.
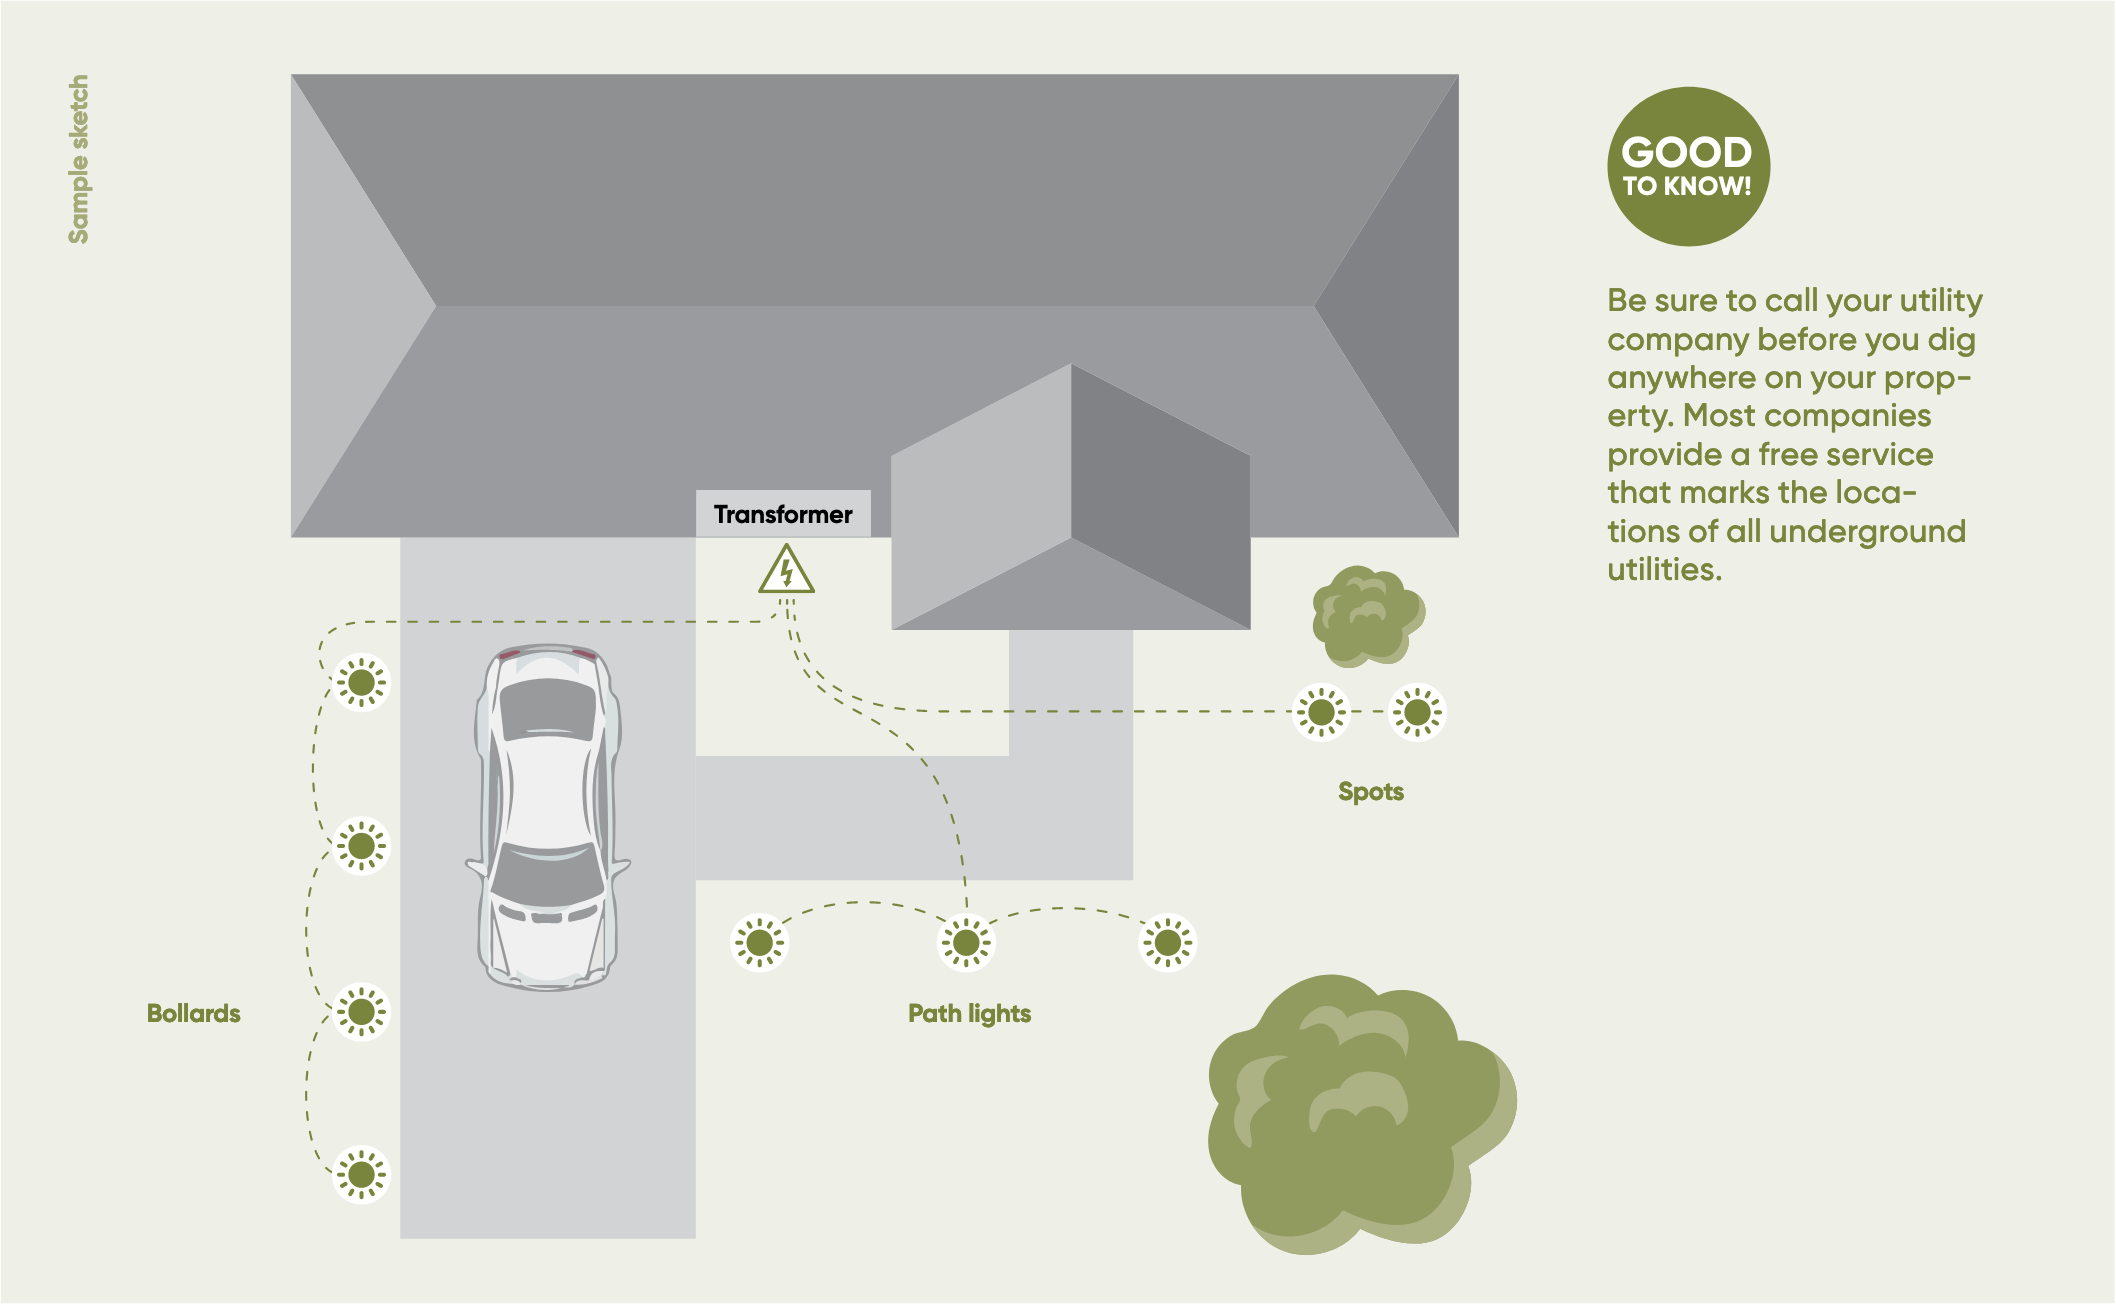
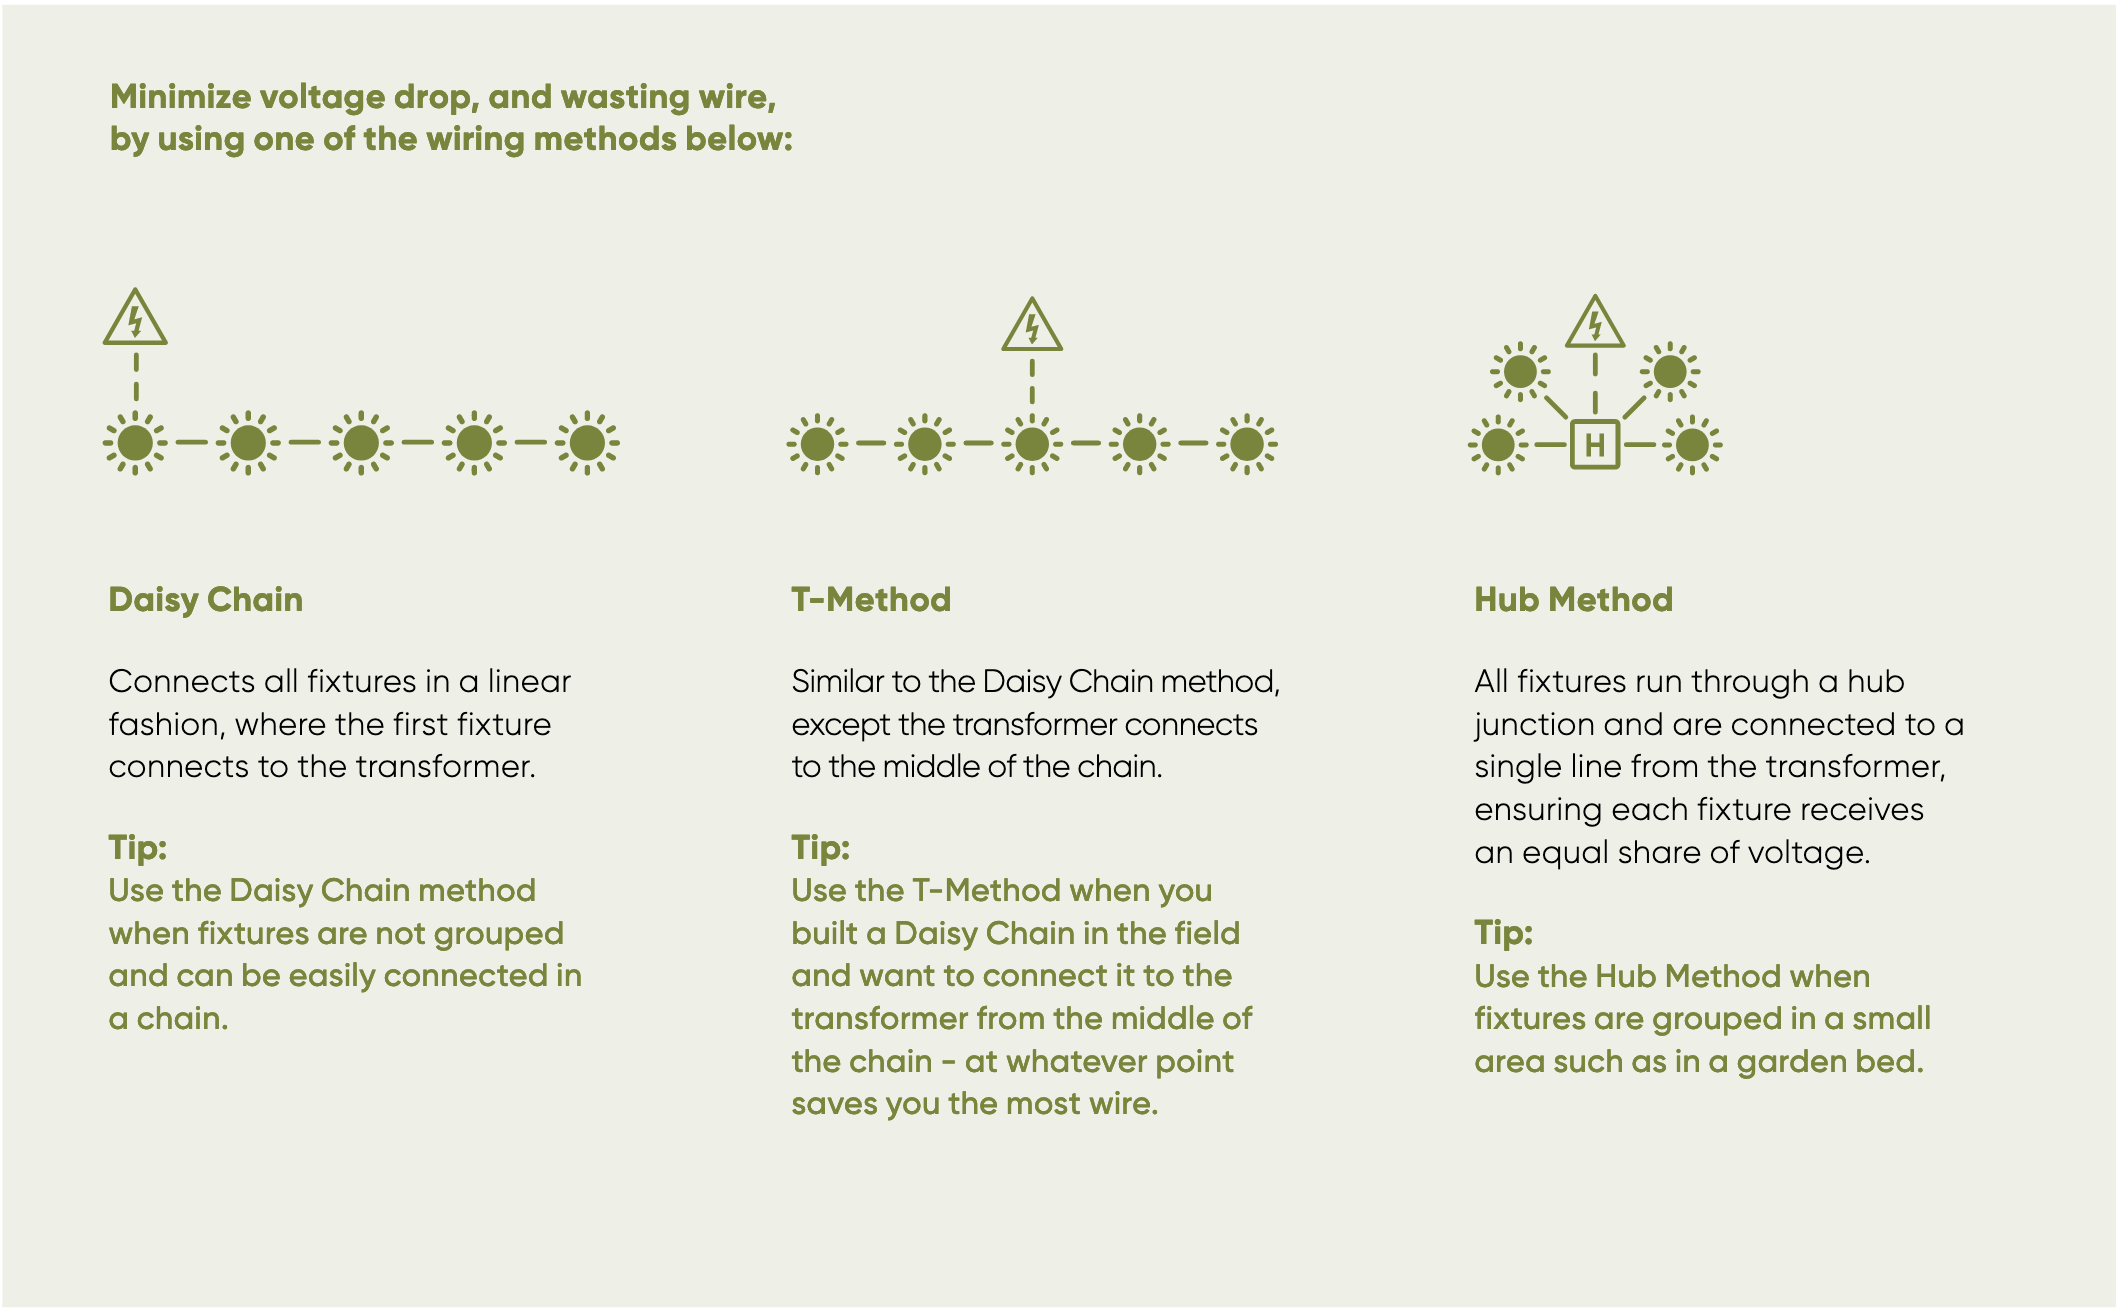
Now you need to provide power to the fixtures. The length of runs helps to determine what gauge of wire to buy. As a general rule, DALS suggests keeping the runs under 50 feet with a maximum of 8 fixtures per run. Lower loads per run means lower voltage drop. What is voltage drop? Voltage increases as it moves through a run of wire and a series of lights. This means that, because each light is receiving a little less than the one before it, lights can appear dimmer toward the end of a series. A small loss is OK, but anything more than a 1.5-volt drop should be corrected.
Checklist
Before you get ready to install your lights, make sure you have all the tools and accessories required. Here’s a basic list of what you might need: landscape lights, transformer, waterproof junction box to protect connections, flat-blade shovel or edger, wire cutters, wire strippers, voltage meter, tape measure, hardwire to install transformer on building or post.
Important!
Check your LED fixtures’ voltage requirements. This plan is for use as a guide only to help you begin your lighting project. We strongly recommend checking the actual voltage at each fixture with a volt-meter before burying and finalizing your project.

Head over to PROLIGHTING and shop the entire DALS line. Need help? Contact the PROs! Our skilled team can help with product questions, layouts, quotes, and more. For an even faster response, use the live chat feature on our site (available M-F, 8AM-5PM ET).
PROLIGHTING® is an authorized distributor of DALS Lighting.


Comments are closed.