
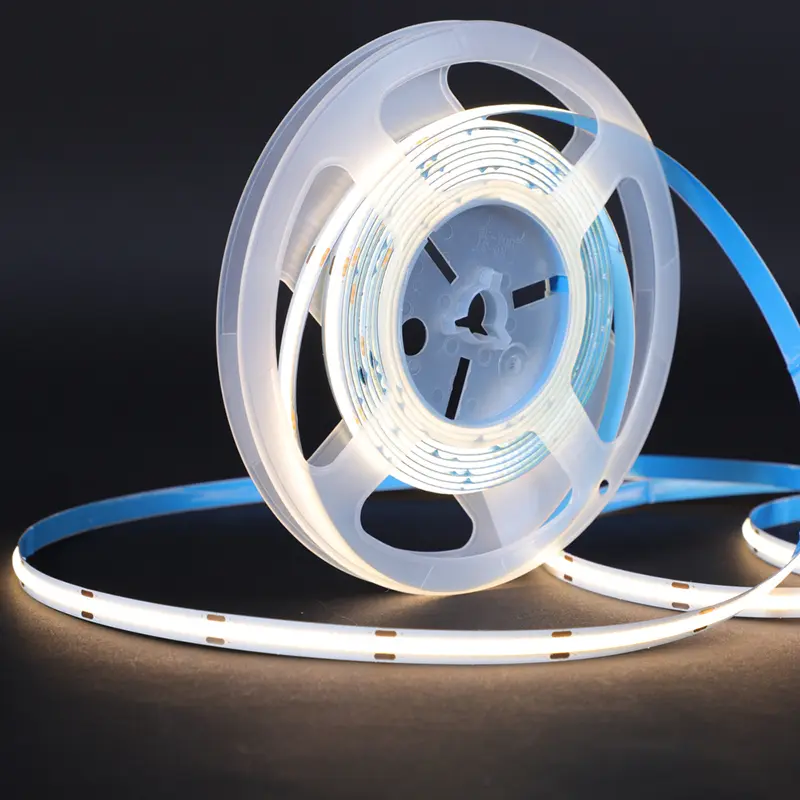
LED tape light (sometimes called “LED strip light”) is one of the most versatile lighting solutions available today. This flexible, cuttable lighting comes on a roll, completely different from rigid LED strip fixtures you’d find in shops or garages. Whether you’re installing under cabinet lighting in your kitchen or adding outdoor LED tape light to your patio, these flexible systems offer unmatched customization and energy efficiency.
We find that choosing the right components, voltage, brightness, waterproof ratings, connectors, and power supplies can feel overwhelming, especially for first-time buyers.
This guide simplifies the process with a real kitchen under cabinet LED lighting example, walking you through every decision from initial measurement to final installation.
You’ll learn how to:
- Calculate the length you need for your project
- Choose between 12V and 24V LED tape light systems
- Select the right IP rating for indoor vs outdoor LED tape light
- Size your LED tape light power supply correctly
- Pick accessories like LED tape light connectors and aluminum channels
Follow these steps for a smooth, professional-looking LED tape light installation.
Step 1: Measure Your Space and Plan Your Layout
Let’s work through a real example: under cabinet LED lighting installation using LED tape light in a kitchen.
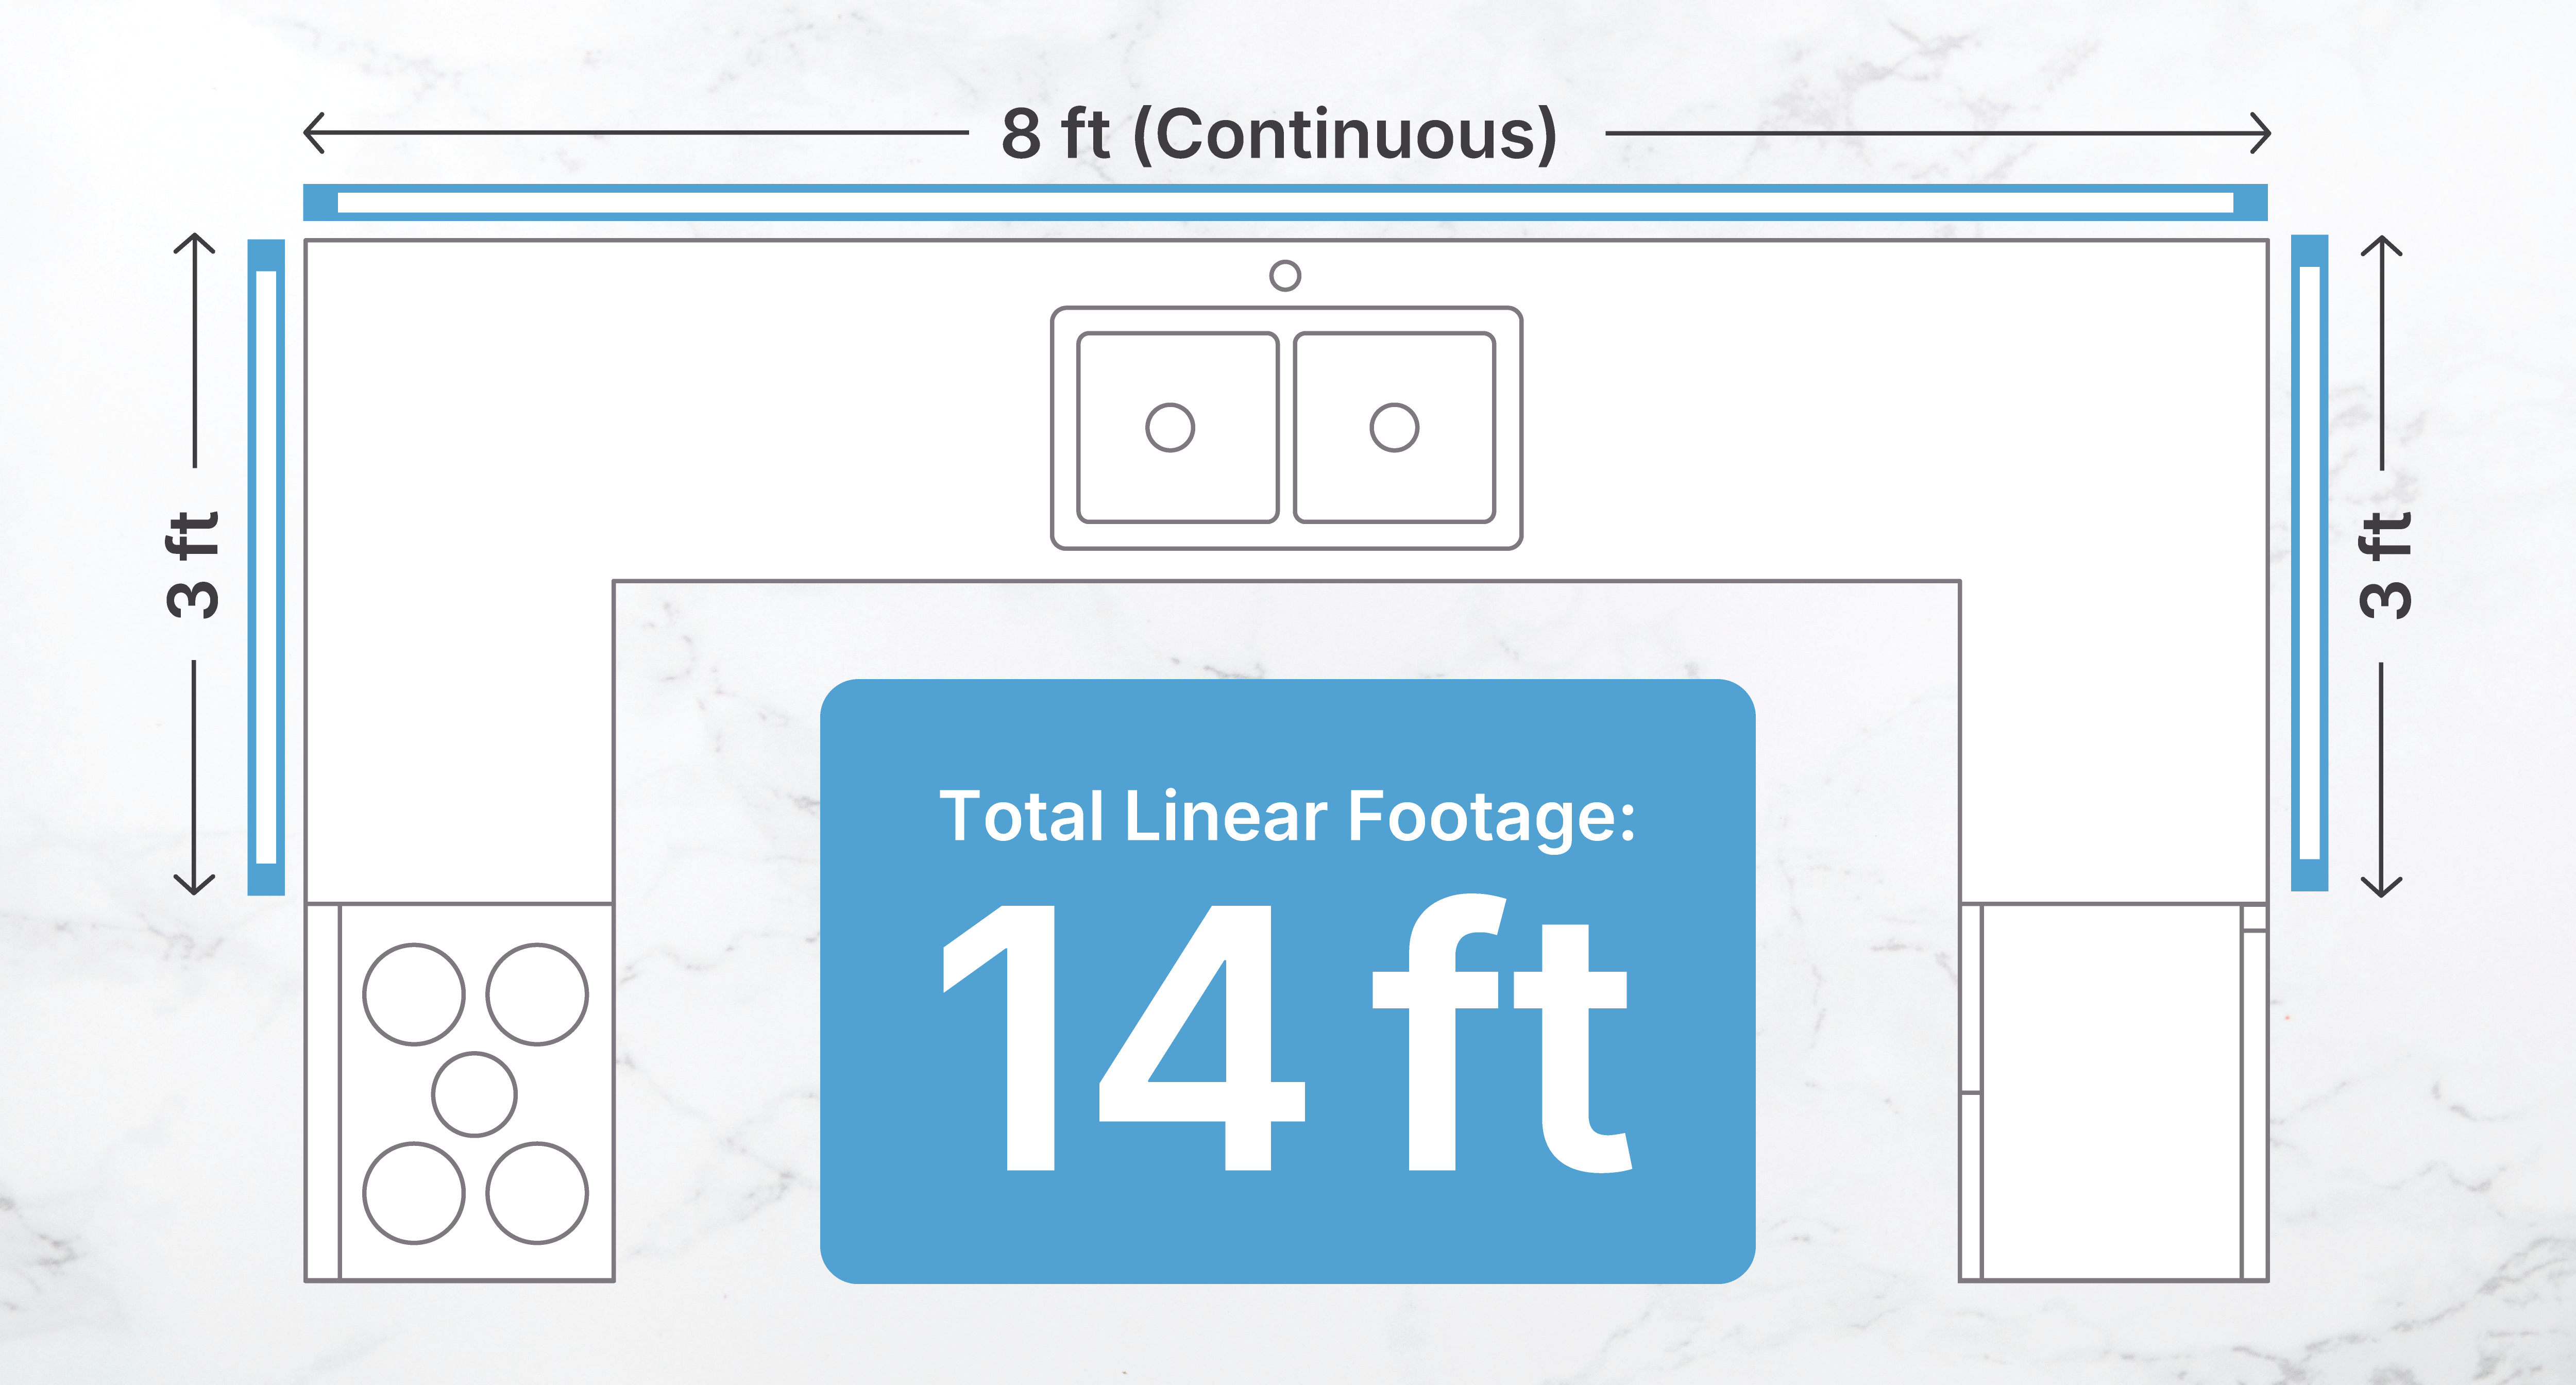
Our Example Project: Kitchen Under Cabinet LED Lighting
The Layout:
- Main counter run above sink: 8 feet (continuous)
- Secondary runs: Two 3-foot sections under other cabinets
- Total linear footage needed: 8 + 3 + 3 = 14 feet
Understanding Maximum Run Length
Here’s where many DIY projects go wrong: you can’t always connect over 16 feet in one continuous run. Every tape light product has a maximum run length. Max run length is the longest continuous section you can power from a single point before voltage drop causes dimming at the far end.
Typical Maximum Run Lengths:
- 12V systems: 16 feet maximum (most common)
- 24V systems: 32 feet maximum (some allow up to 50+ feet)
Always check your specific tape light’s spec sheet for exact maximum run length. This varies by wattage and manufacturer.
For our 8-foot main counter run, we’re well within limits. But here’s an important consideration: if the location of your tape light runs are in different locations across the room. This creates a wiring challenge we’ll address in Step 4 when selecting and placing your power supply.
PRO Tip: Going beyond maximum run length voids warranties and causes uneven brightness or premature failure.
Step 2: Choose Your LED Tape Light Specifications
Now that you know how much you need, let’s select the right product for your application.
Brightness: Understanding Lumens Per Foot
Brightness is measured in lumens per foot for tape light. Here’s how to choose the right level for your application:
Up to 299 Lumens Per Foot – Accent Lighting
- Best for: Cove lighting, toe kick lighting, decorative accents
- Provides ambient glow without being overwhelming
- Creates subtle illumination for architectural features
- Ideal when you want mood lighting rather than functional task light
300-500 Lumens Per Foot – Task Lighting
- Best for: Under cabinet lighting, workbenches, detailed work areas
- Provides ample light for food prep, reading, and precision tasks
- Most popular choice for kitchen applications
- Balances brightness with energy efficiency
500+ Lumens Per Foot – High-Output/Commercial
- Best for: Retail displays, commercial spaces, bright task lighting
- Maximum brightness for demanding applications
- Often used in workshops, garages, or commercial installations
- Higher wattage requirements (factor into power supply calculations)
For Our Kitchen Example: We’re doing task lighting for under cabinet lighting, so we’ll choose from the 300-500 lumens per foot range. Specifically, we’ll select ~300 lumens per foot for excellent food prep illumination.
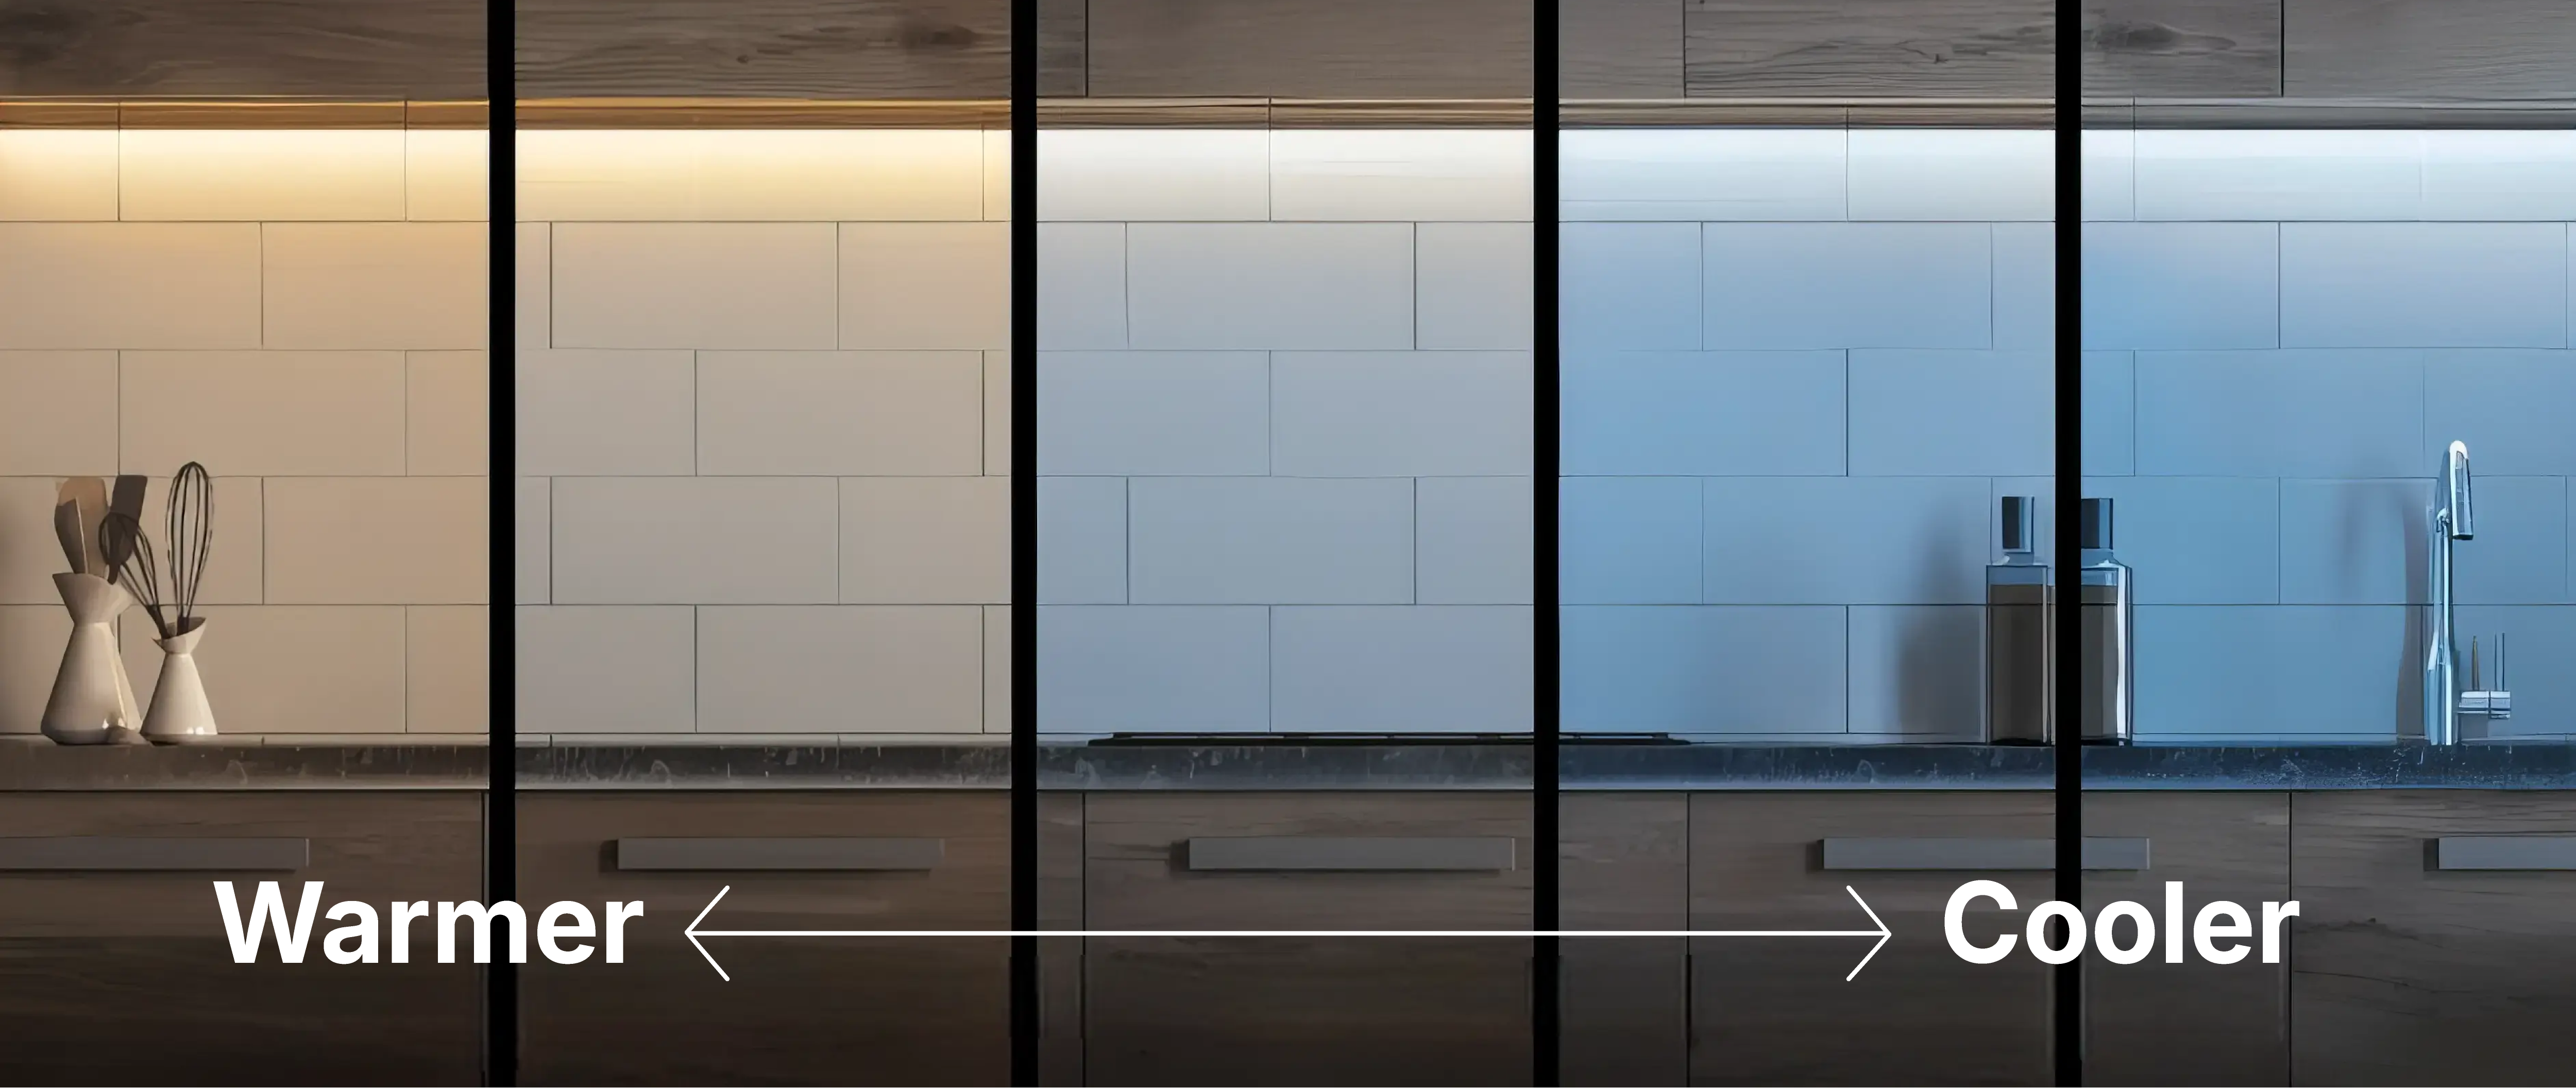
Color Temperature: Warm White vs Cool White LED Tape Light
Color temperature dramatically affects the mood and functionality of your space:
Warm White (2700K-3000K):
- Best for: Kitchens, living spaces, bedrooms
- Creates cozy, inviting atmosphere
- Matches traditional incandescent lighting
Cool White (4000K-5000K):
- Best for: Garages, workshops, commercial spaces
- Provides crisp, focused task lighting
- Matches daylight
Tunable White:
- Adjustable from warm to cool white
- Premium option for maximum flexibility
RGB/RGBW/RGBTW (Color-Changing):
- RGB: Red, Green, Blue color mixing (millions of colors, but poor white quality)
- RGBW: RGB + dedicated white LEDs (better white light)
- RGBTW: RGB + tunable white (most overall colors and white quality)
- Best for: Decorative applications, entertainment spaces, accent lighting
- Requires special controller and typically higher wattage
For Our Kitchen Example: We’ll choose 3000K warm white to match the home’s existing lighting.
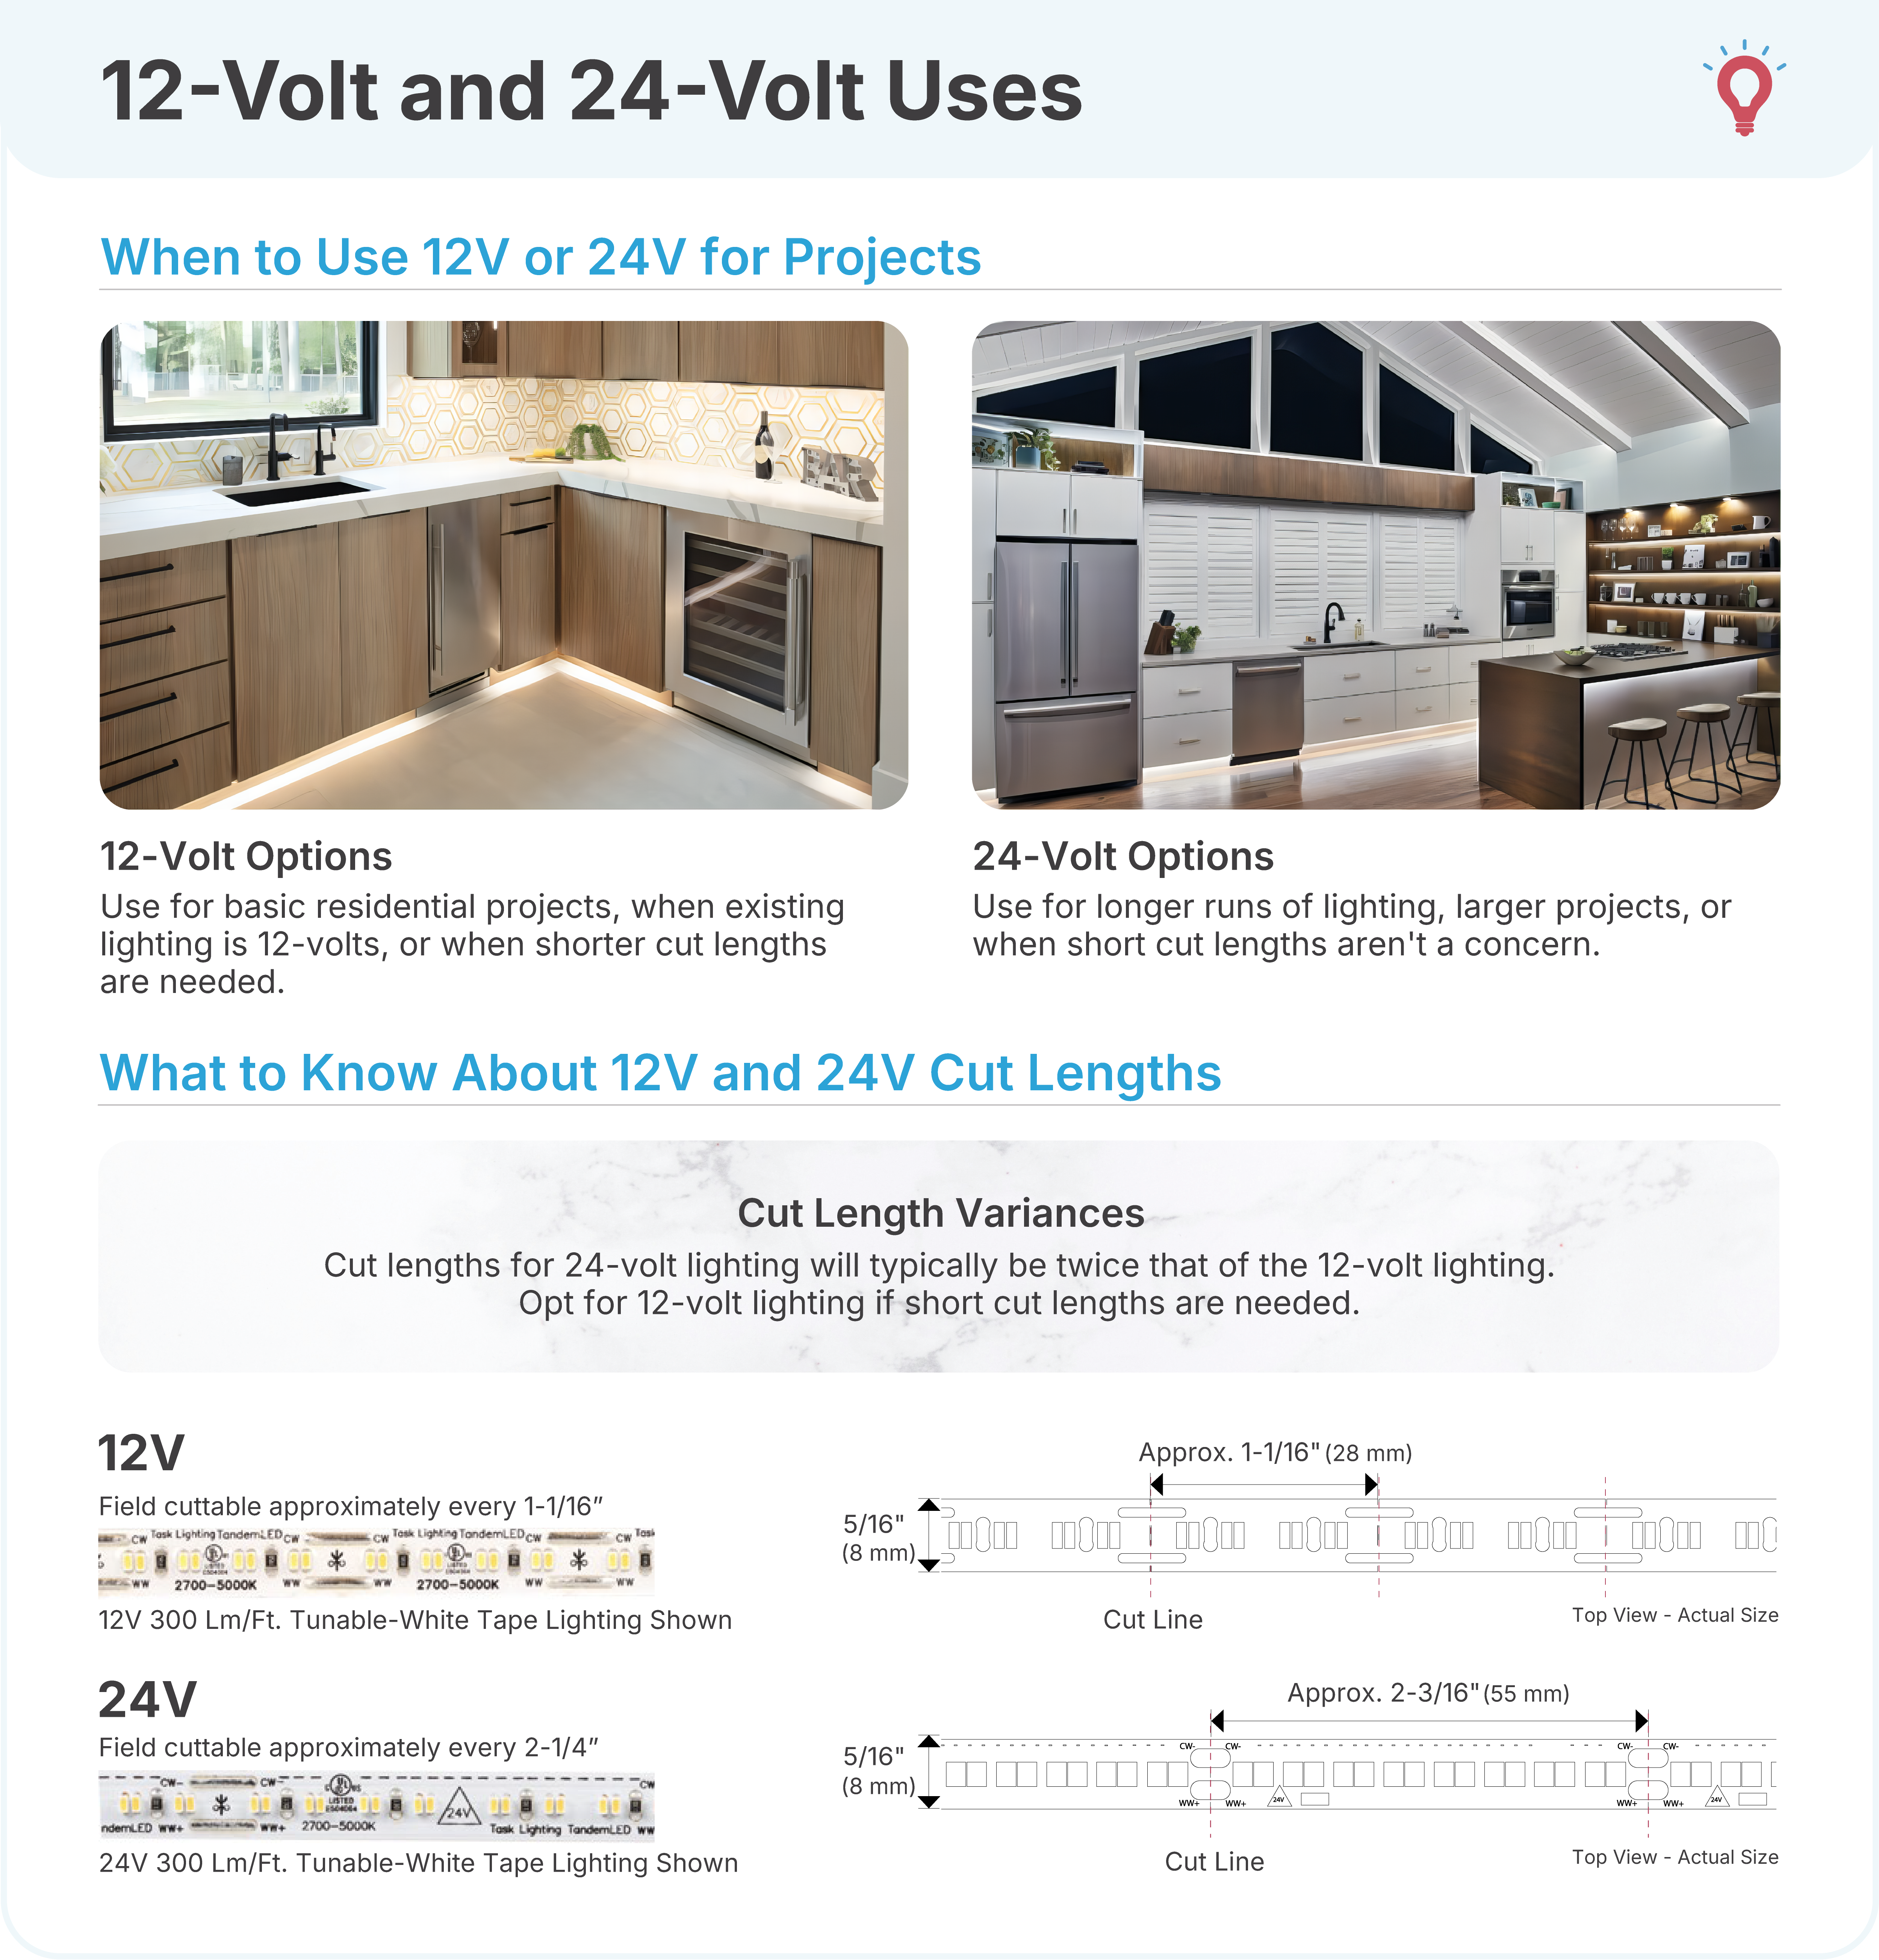
Voltage: 12V vs 24V LED Tape Light
Both 12V and 24V options are considered low voltage, but there are important differences:
12V Systems:
- Pros: wide product selection, more compatible with standard accessories and controllers
- Cons: Shorter maximum run lengths, more voltage drop over distance
- Best for: Shorter runs under 16 feet
24V Systems:
- Pros: Longer maximum run lengths (up to 50 feet), less voltage drop, more energy efficient
- Cons: Slightly higher upfront cost
- Best for: Longer runs, commercial applications, professional installations
For Our Kitchen Example: Since our longest run is only 8 feet, either voltage works. We’ll choose 24V for better long-term performance and efficiency.
Dimmable LED Tape Light
Most LED tape light is dimmable, but you must verify THREE things:
- The tape light itself is rated as dimmable
- You have a compatible dimmer switch
- Your driver/power supply is dimmable
All components must support the same dimming method (TRIAC, 0-10V, etc.) depending on how you plan to dim the tape light.
Dimming options include:
- Driver with built-in dimming (0-10V or TRIAC) – Most common for professional installations
- In-line dimmer (installed between driver and tape) – Good for retrofit projects
- Smart controls with app/voice control – Premium option
Important: Match your dimming type to your system. If you’re using a TRIAC wall dimmer (like many Lutron offerings), you’ll need a TRIAC-dimmable driver. If you’re using 0-10V controls (common in commercial), you’ll need a 0-10V dimmable driver. Check both the tape light spec sheet AND the driver spec sheet to confirm compatibility.
PRO TIP:
For an even simpler installation, consider a combo driver/dimmer unit like the Diode LED SWITCHEX R1. These patented units combine the power supply and dimmer switch into one compact device that fits in a standard electrical gang box. Instead of installing a separate driver and wall dimmer, you get both functions in a single unit. Available in 12V and 24V versions from 40W to 96W capacity.
Step 3: Outdoor LED Tape Light and Waterproof Ratings
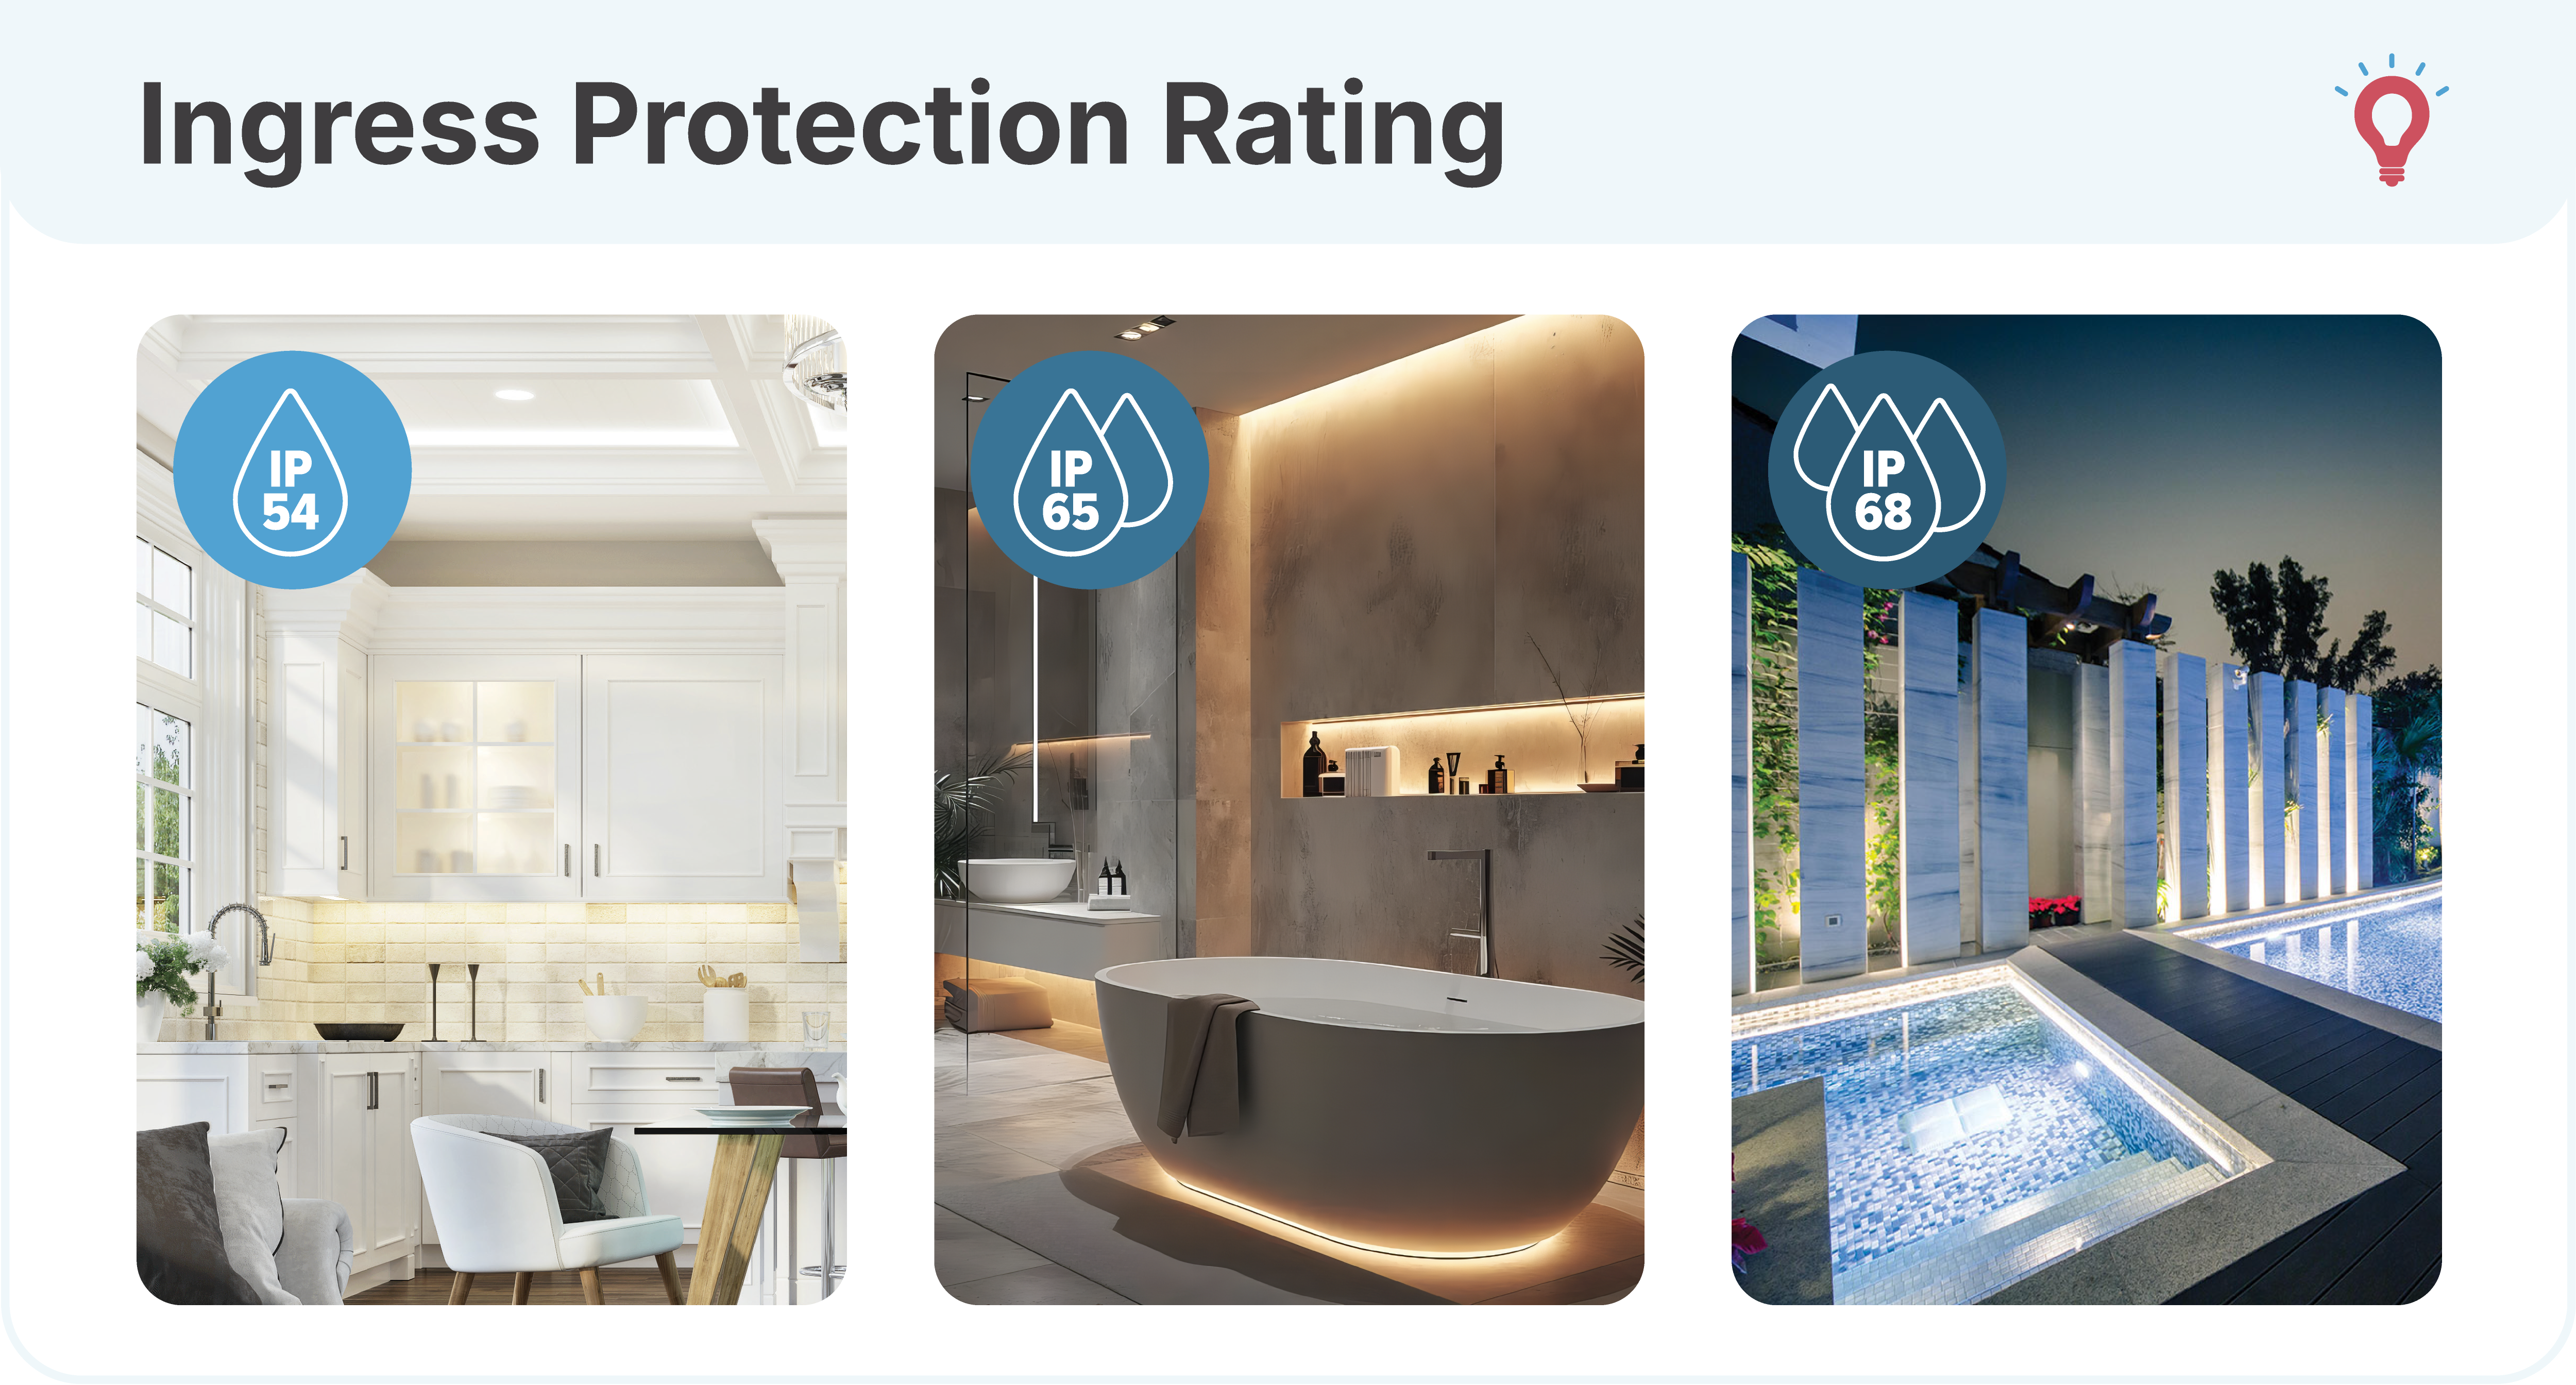
One of the most critical decisions when selecting LED tape light: choosing the right IP rating for your installation location, especially for outdoor LED tape light or waterproof LED tape light applications.
IP Rating Guide for LED Tape Light
IP20 (Dry Location):
- No moisture protection
- Use for: Interior dry locations only (under cabinets, cove lighting, closets, living spaces)
- Cannot be used where moisture is present
- Lowest cost option
IP54 (Damp Location):
- Light nano-coating protects from moisture and dust
- Use for: Bathrooms, laundry rooms, covered outdoor areas with indirect moisture exposure
- Can handle humidity and occasional condensation but not direct water contact
- Not suitable for direct rain or wet conditions
- Silicone coating on top surface
- Use for: Outdoor installations with direct weather exposure (patios, decks, eaves, landscaping)
- Can handle rain, snow, and direct water contact
- Most common outdoor tape light option
IP67/IP68 (Submersible):
- Fully sealed in silicone sleeve
- Use for: Pool lighting, fountain lighting, pond lighting, marine applications
- Only ratings suitable for permanent underwater installation
- IP67: Temporary submersion
- IP68: Permanent underwater use
- Most expensive option
Important: Always verify the tape light is listed for your specific location type (dry, damp, or wet). Check the operating temperature range – outdoor installations in extreme climates may require extended temperature ratings.
Selecting Our Tape Light
For Our Kitchen Example: Now that we’ve covered the basic specifications and location requirements, we chose Lotus LED COB Tape Light 24V 3000K (LBL-COB-384-24V-10MM-30K-IP65).
Why this product:
- 300 lumens per foot (task lighting level)
- 3000K warm white (matches existing kitchen lighting)
- 24V system (efficient, longer runs possible)
- IP65 wet location rated (exceeds our damp location needs for kitchen under cabinet)
- 3 watts per foot (important for power calculations in Step 4)
- COB technology (seamless light, no visible dots)
- Maximum run length: 16.4 feet per section
This product choice gives us everything we need for professional under cabinet lighting.
Step 4: Calculate Your LED Tape Light Power Supply Requirements
Calculating your LED tape light power supply requirements is simpler than you think.
Power Supply Sizing Formula
Total Wattage = Watts per Foot × Total Feet
Then add 20% safety margin:
Power Supply Size Needed = Total Wattage × 1.2
Our Kitchen Example Calculation
Using our chosen Lotus COB Tape Light:
- 24V system
- 3 watts per foot (from spec sheet)
- Maximum run length: 16.4 feet
- Total length needed: 14 feet
Step 1: Calculate total wattage 3 watts/foot × 14 feet = 42 watts
Step 2: Add 20% safety margin 42 watts × 1.2 = 50.4 watts
Step 3: Select power supply We need a 24V, 50-watt driver minimum. We’ll use the Lotus 60W Dimmable Driver (SMT-024-060VTDHV2) which provides 60W output at 24V DC.
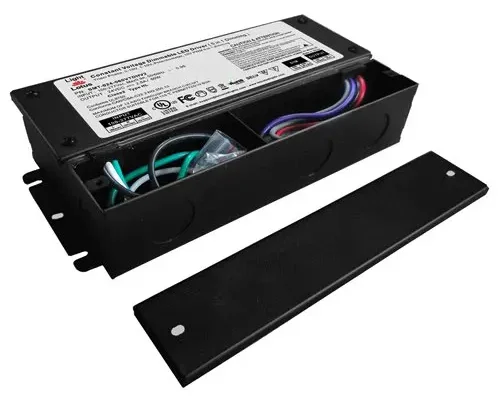
This driver features 5-in-1 dimming compatibility (TRIAC, 0-10V, 1-10V, Potentiometer, 10V PWM), making it compatible with most wall dimmers including Lutron. It’s UL-listed Class 2, wet location rated, and includes built-in wiring compartments for clean installation. The 120V-277V input works with both residential and commercial power.
Layout Consideration: Our three cabinet sections are near each other in the kitchen. In your situation, you may choose to use separate drivers by location to reduce wiring across the kitchen.
Browse our complete selection of LED tape light drivers and power supplies.
PRO Tip: Never max out your power supply. The 20% buffer prevents overheating, extends driver life, and accounts for voltage drop.
Single vs Multiple Drivers – How to Choose
If our kitchen had three separate cabinet runs in different locations, we have two options:
Option 1: Single Large Power Supply with Parallel Runs
- One 60W Lotus driver in central location
- Separate wire runs to each cabinet section
- More professional, cleaner installation
- Challenge: Need to run low-voltage wires across kitchen to each section
Option 2: Multiple Smaller Power Supplies
- One driver per cabinet section
- Easier wiring, no long runs across the kitchen
- More visible (multiple power supplies to hide)
- Good for retrofit projects
For Our Kitchen Example: We’ll use Option 1 with a single Lotus 60W driver (SMT-024-060VTDHV2) hidden in the corner cabinet. We’ll run low-voltage wires to each section. This keeps the installation clean with just one power source and one dimmer control for all zones.
PRO tip: Instead of a separate driver + dimmer, you could use a combo unit like the SWITCHEX R1 24V 60W to combine both functions in one device.
Step 5: Essential LED Tape Light Accessories
Professional-looking installations require the right accessories.
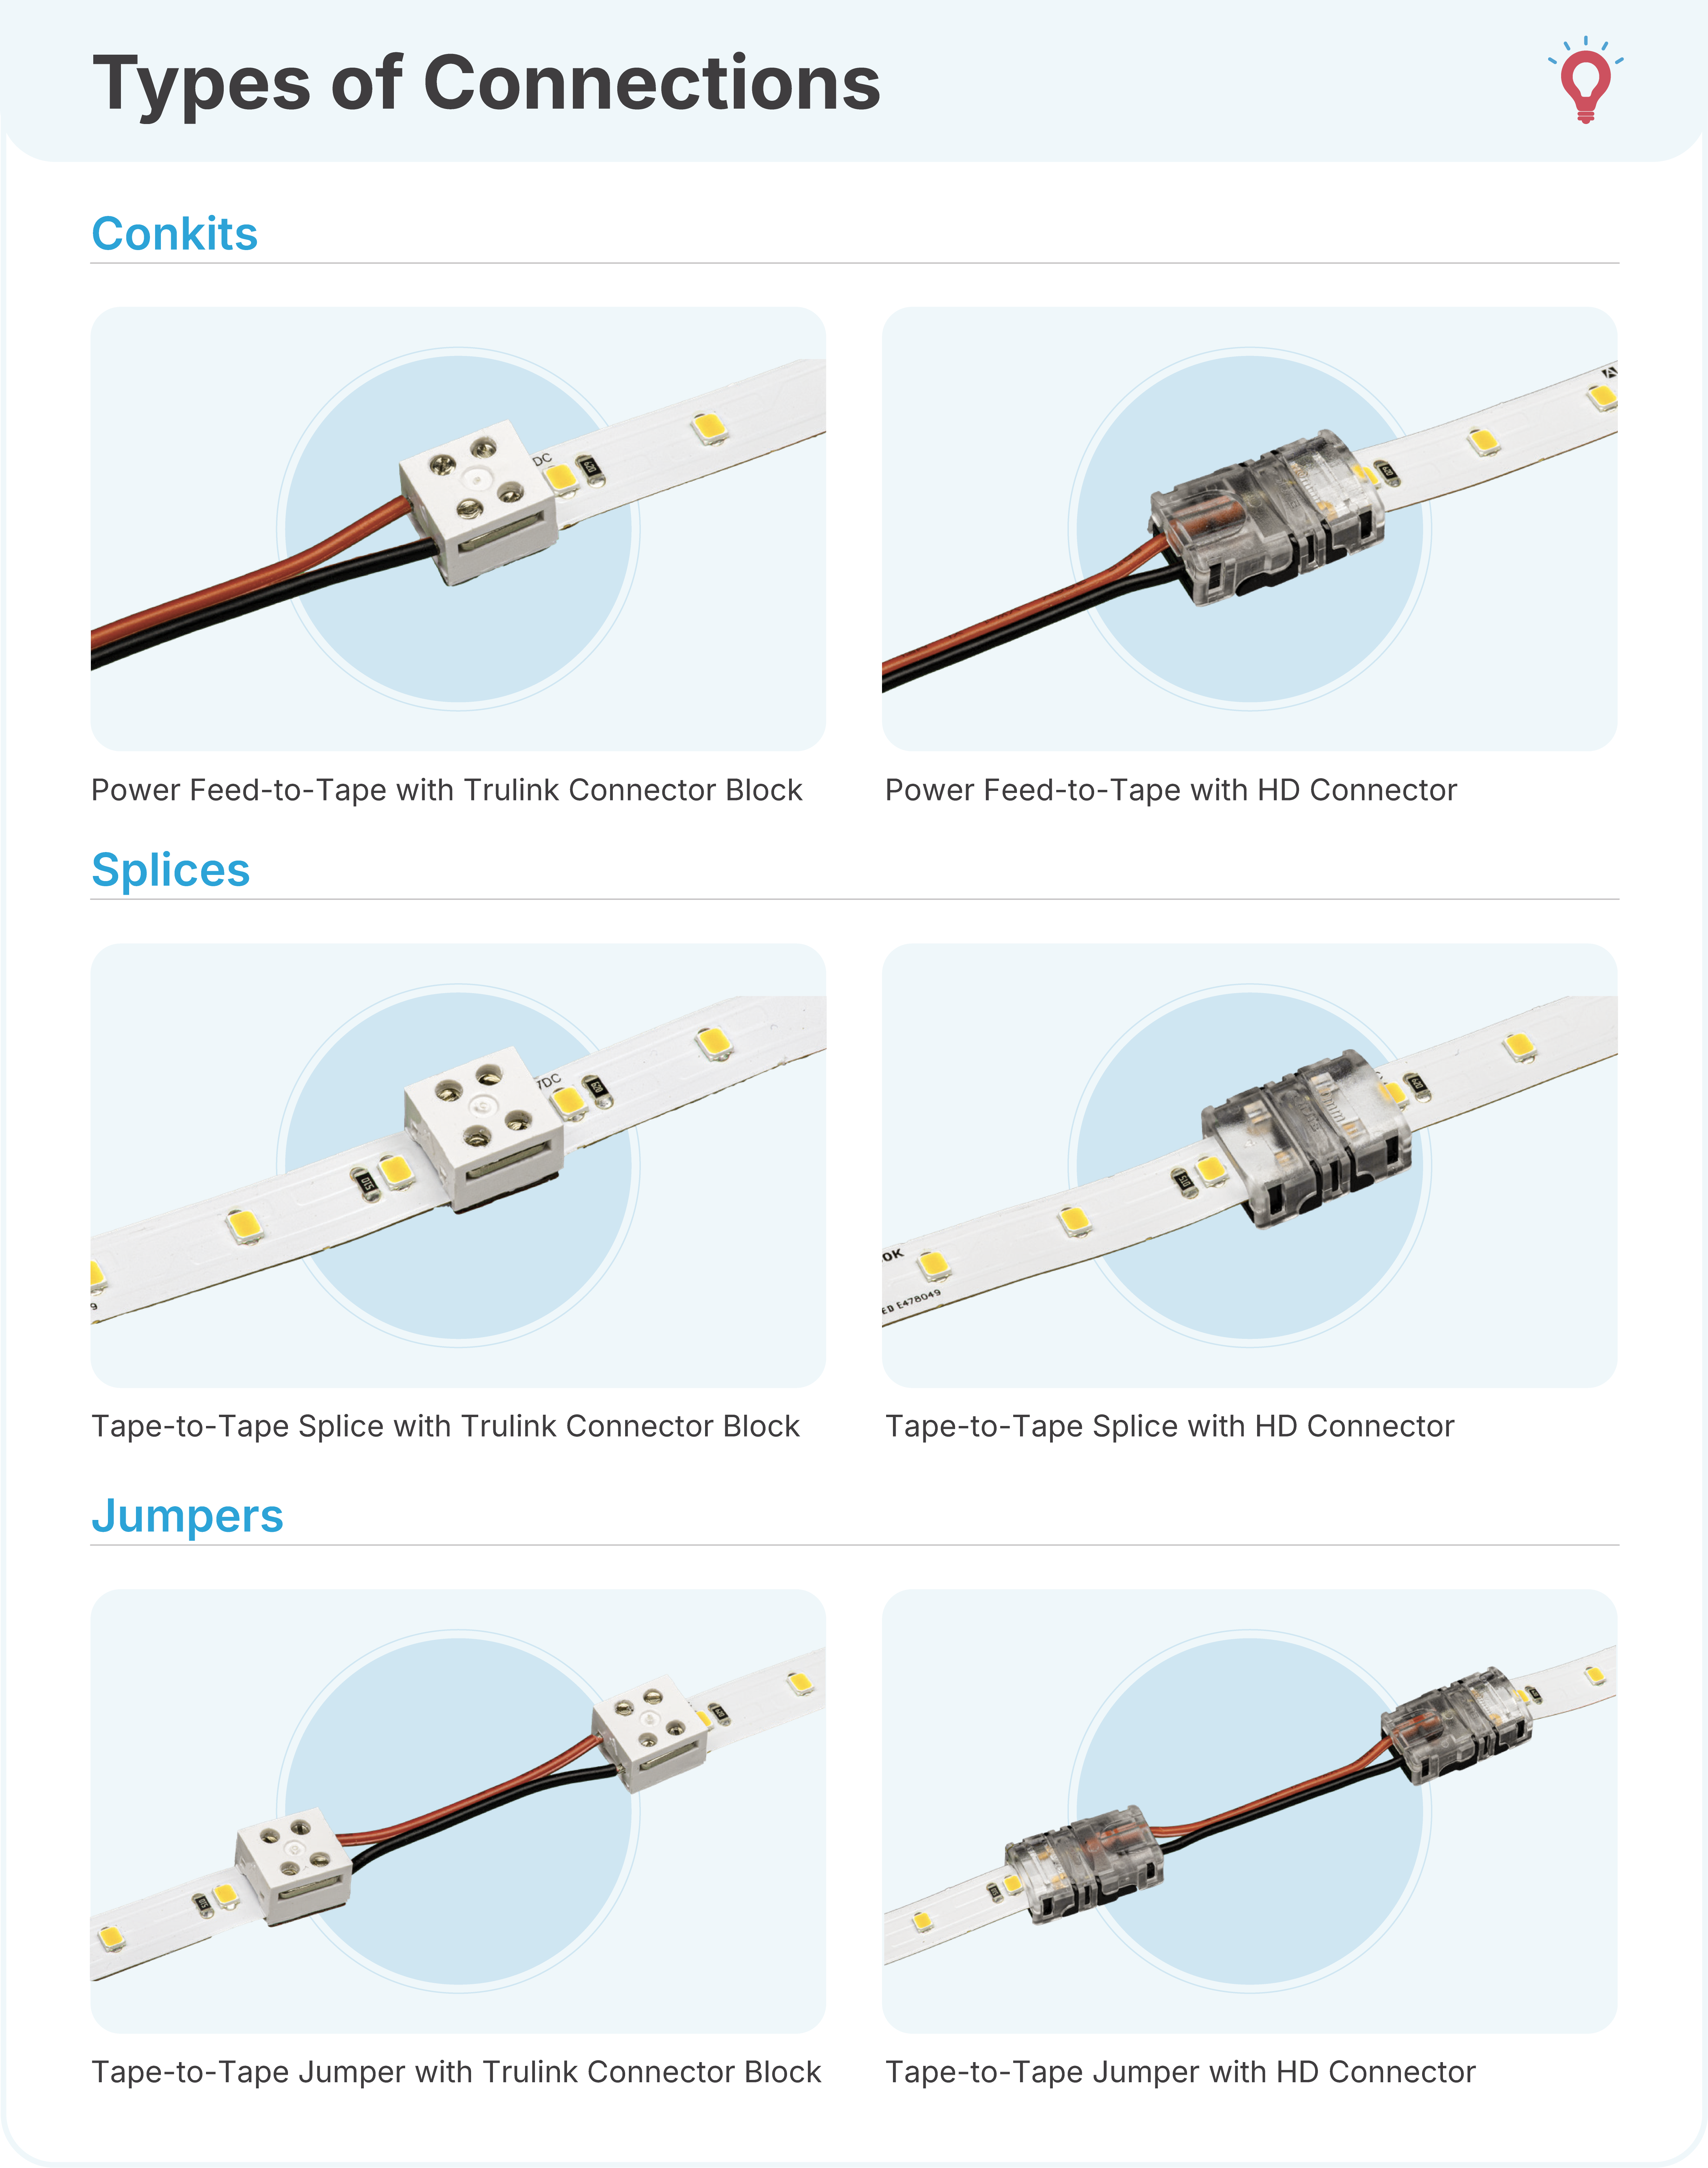
LED Tape Light Connectors
You’ll need various led tape light accessories to create a complete system:
Solderless Connectors (Recommended for DIY):
- Strip-to-Wire connectors – Connect tape to power wires
- Strip-to-Strip connectors – Join two tape sections
- L-connectors – Make 90-degree corners
- T-connectors – Create branch points
- Jumper wires – Span gaps between cabinets
Why Connectors Matter: Soldering is difficult and risks damaging the LEDs. Quality solderless connectors make installation faster and more reliable.
Shop all LED tape light accessories and connectors
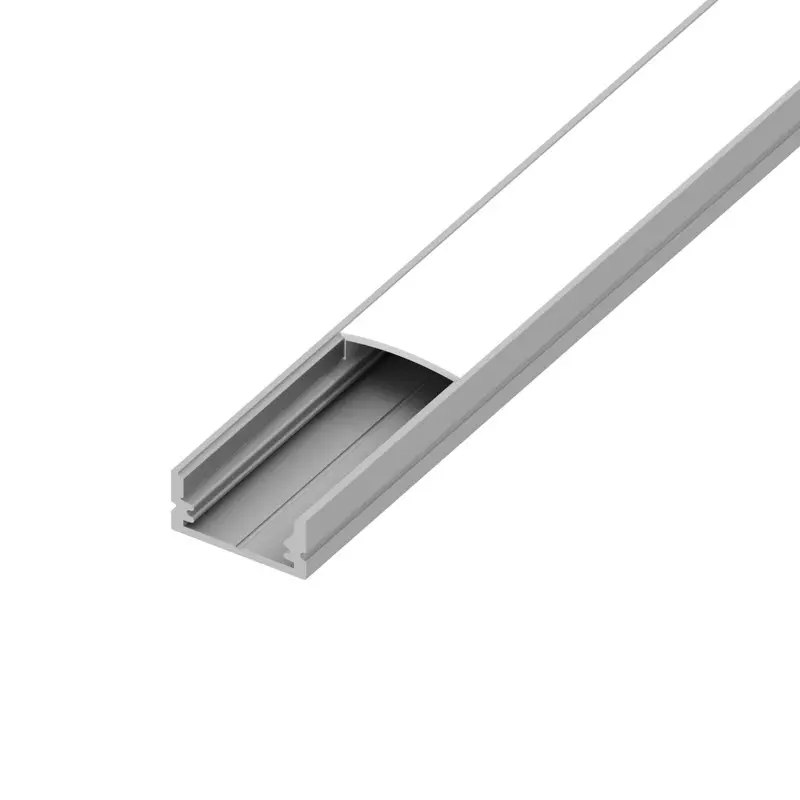
Aluminum Channels and LED Tape Light Diffusers
While not required, aluminum channels dramatically improve appearance and longevity:
Why We Chose COB Tape Light:
Our Lotus COB tape light already features seamless linear light with minimal visible LED dots thanks to its phosphor coating technology. This partially eliminates the need for diffusers to hide individual LED “hot spots.”
Benefits of Using Channels (Even with COB):
- Heat dissipation – Extends LED lifespan by 2-3x by acting as a heat sink
- Clean installation – Professional mounting system, no adhesive failure issues
- Physical protection – Prevents damage to tape from impacts or cleaning
- Easier mounting – Secure mechanical attachment vs adhesive-only
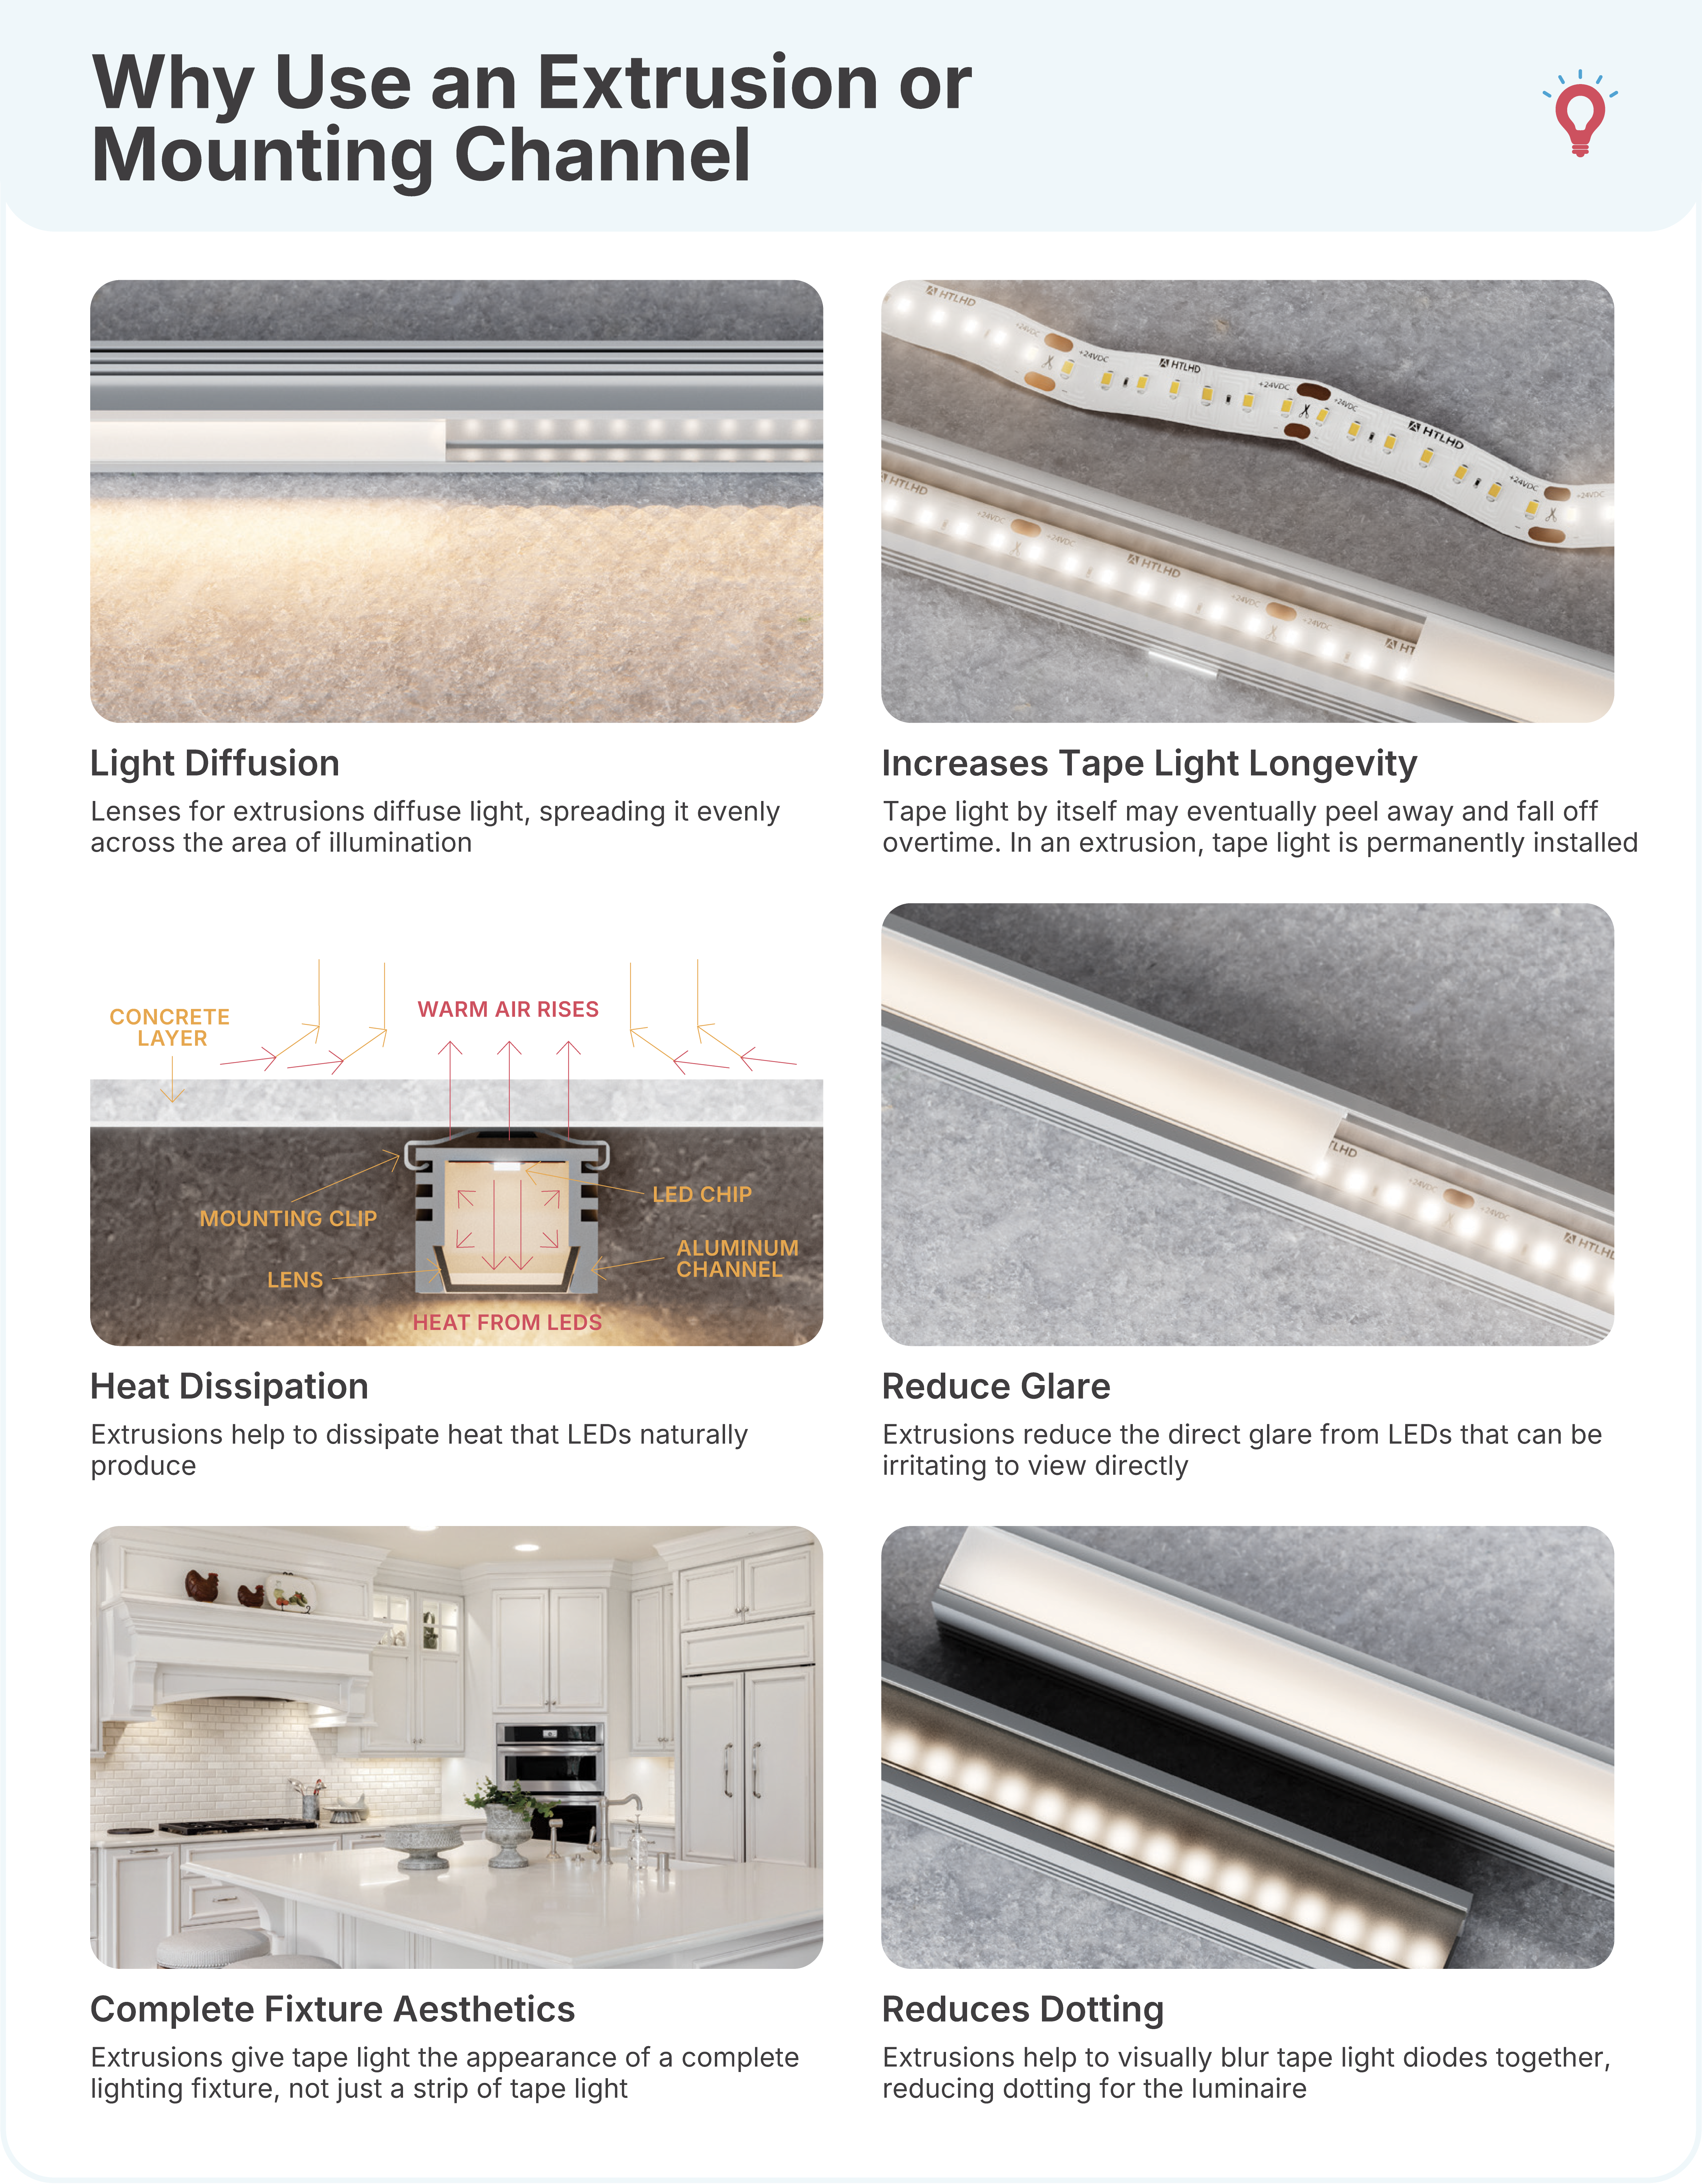
LED Tape Light Diffuser Options:
- Clear diffuser – Maximum light output, slight dot reduction
- Frosted diffuser – Smooth, even light line, 10-15% light loss
- Opal diffuser – Complete dot removal, 20% light loss
For Our Kitchen Example: Since we’re using COB tape light with its seamless appearance, we could install it directly in an aluminum channel without a diffuser for maximum light output and heat dissipation. Alternatively, adding a frosted diffuser creates an even more refined appearance with minimal light loss.
Browse our selection of aluminum channels and mounting profiles
Cutting LED Tape Light: Where and How
Most tape has designated cut points marked with scissor icons or copper pads, typically every 1-6 inches.
How to Cut Properly:
- Measure exact length needed
- Find nearest cut mark
- Use sharp scissors for clean cut
- Never cut between marks, you’ll damage the circuit
Cutting Tips:
- Save cutoffs, short pieces can still be used
- Unused sections cannot be returned once cut
- Check spec sheet for cut points
Step 6: LED Tape Light Installation Overview
While detailed installation is beyond this buying guide, here’s the basic process:
DIY Installation Steps
For Dry Locations (IP20):
- Clean and degrease mounting surface
- Mount aluminum channel (if using)
- Apply tape, pressing firmly
- Make electrical connections with solderless connectors
- Connect to power supply
- Test before finalizing installation
- Install diffuser (if using channel)
For Outdoor or Waterproof Installations:
- Use proper IP rated products for your application (typically IP65 or IP67)
- All connections must be sealed with waterproof connectors or heat shrink
- Use outdoor-rated wire and weatherproof power supplies
- Consider professional installation for permanent outdoor lighting
Plug-in vs Hardwired Options
Plug-in Systems:
- Easiest for DIY installation
- Power supply (driver) plugs into standard outlet
- Good for under cabinet, closets, retrofit installations
- Limited to areas near outlets
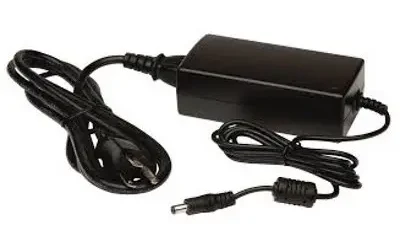
American Lighting 60W LED Plug-In Driver – 24V
Hardwired Systems:
- Driver hardwires directly to household wiring
- Professional-looking, no visible cords
- May require electrician depending on local codes
- Best for permanent installations, commercial projects, new construction

Your LED Tape Light Shopping Checklist
Ready to buy? Here’s what you may need:
IMPORTANT: This checklist is based on our specific kitchen example. Your project may require different quantities or components depending on your layout and installation method. Always measure your space and plan accordingly before ordering. If you need help planning, contact our PRO’s!
For Our Kitchen Example (14 feet total):
- Lotus COB Tape Light 24V 3000K (LBL-COB-384-24V-10MM-30K-IP65) – 1 roll (16.4 ft covers our 14 ft needed with margin)
- Lotus 60W 24V Dimmable Driver (SMT-024-060VTDHV2) & Lutron Diva C.L Dimmer (DVCL-153P-WH) –
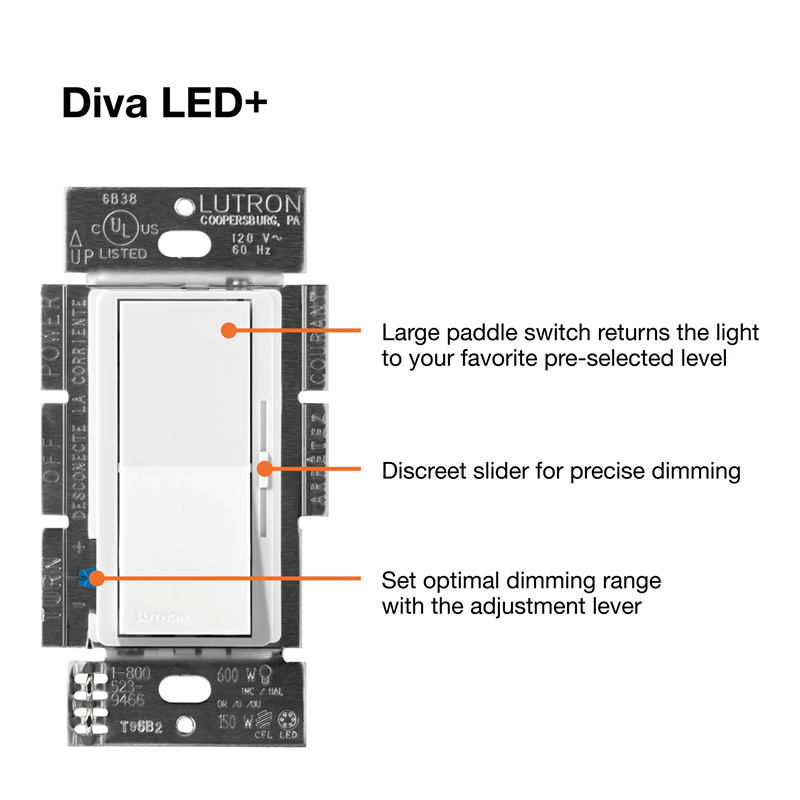
Lutron Diva LED+ Dimmer Separate driver and wall dimmer
OR
- Diode LED SWITCHEX R1 24V60W (DI-SXR1-24V60W) – All-in-one combo unit (replaces both driver and dimmer)
- 3M VHB Adhesive Tape (3MT-5m) – Secure mounting tape
- Strip-to-Wire Connectors (SC-8-10-TW) – Qty: 6 (2 per cabinet section, always get extra)
- Low Voltage Wire 16 AWG – 25-35 feet for runs across kitchen
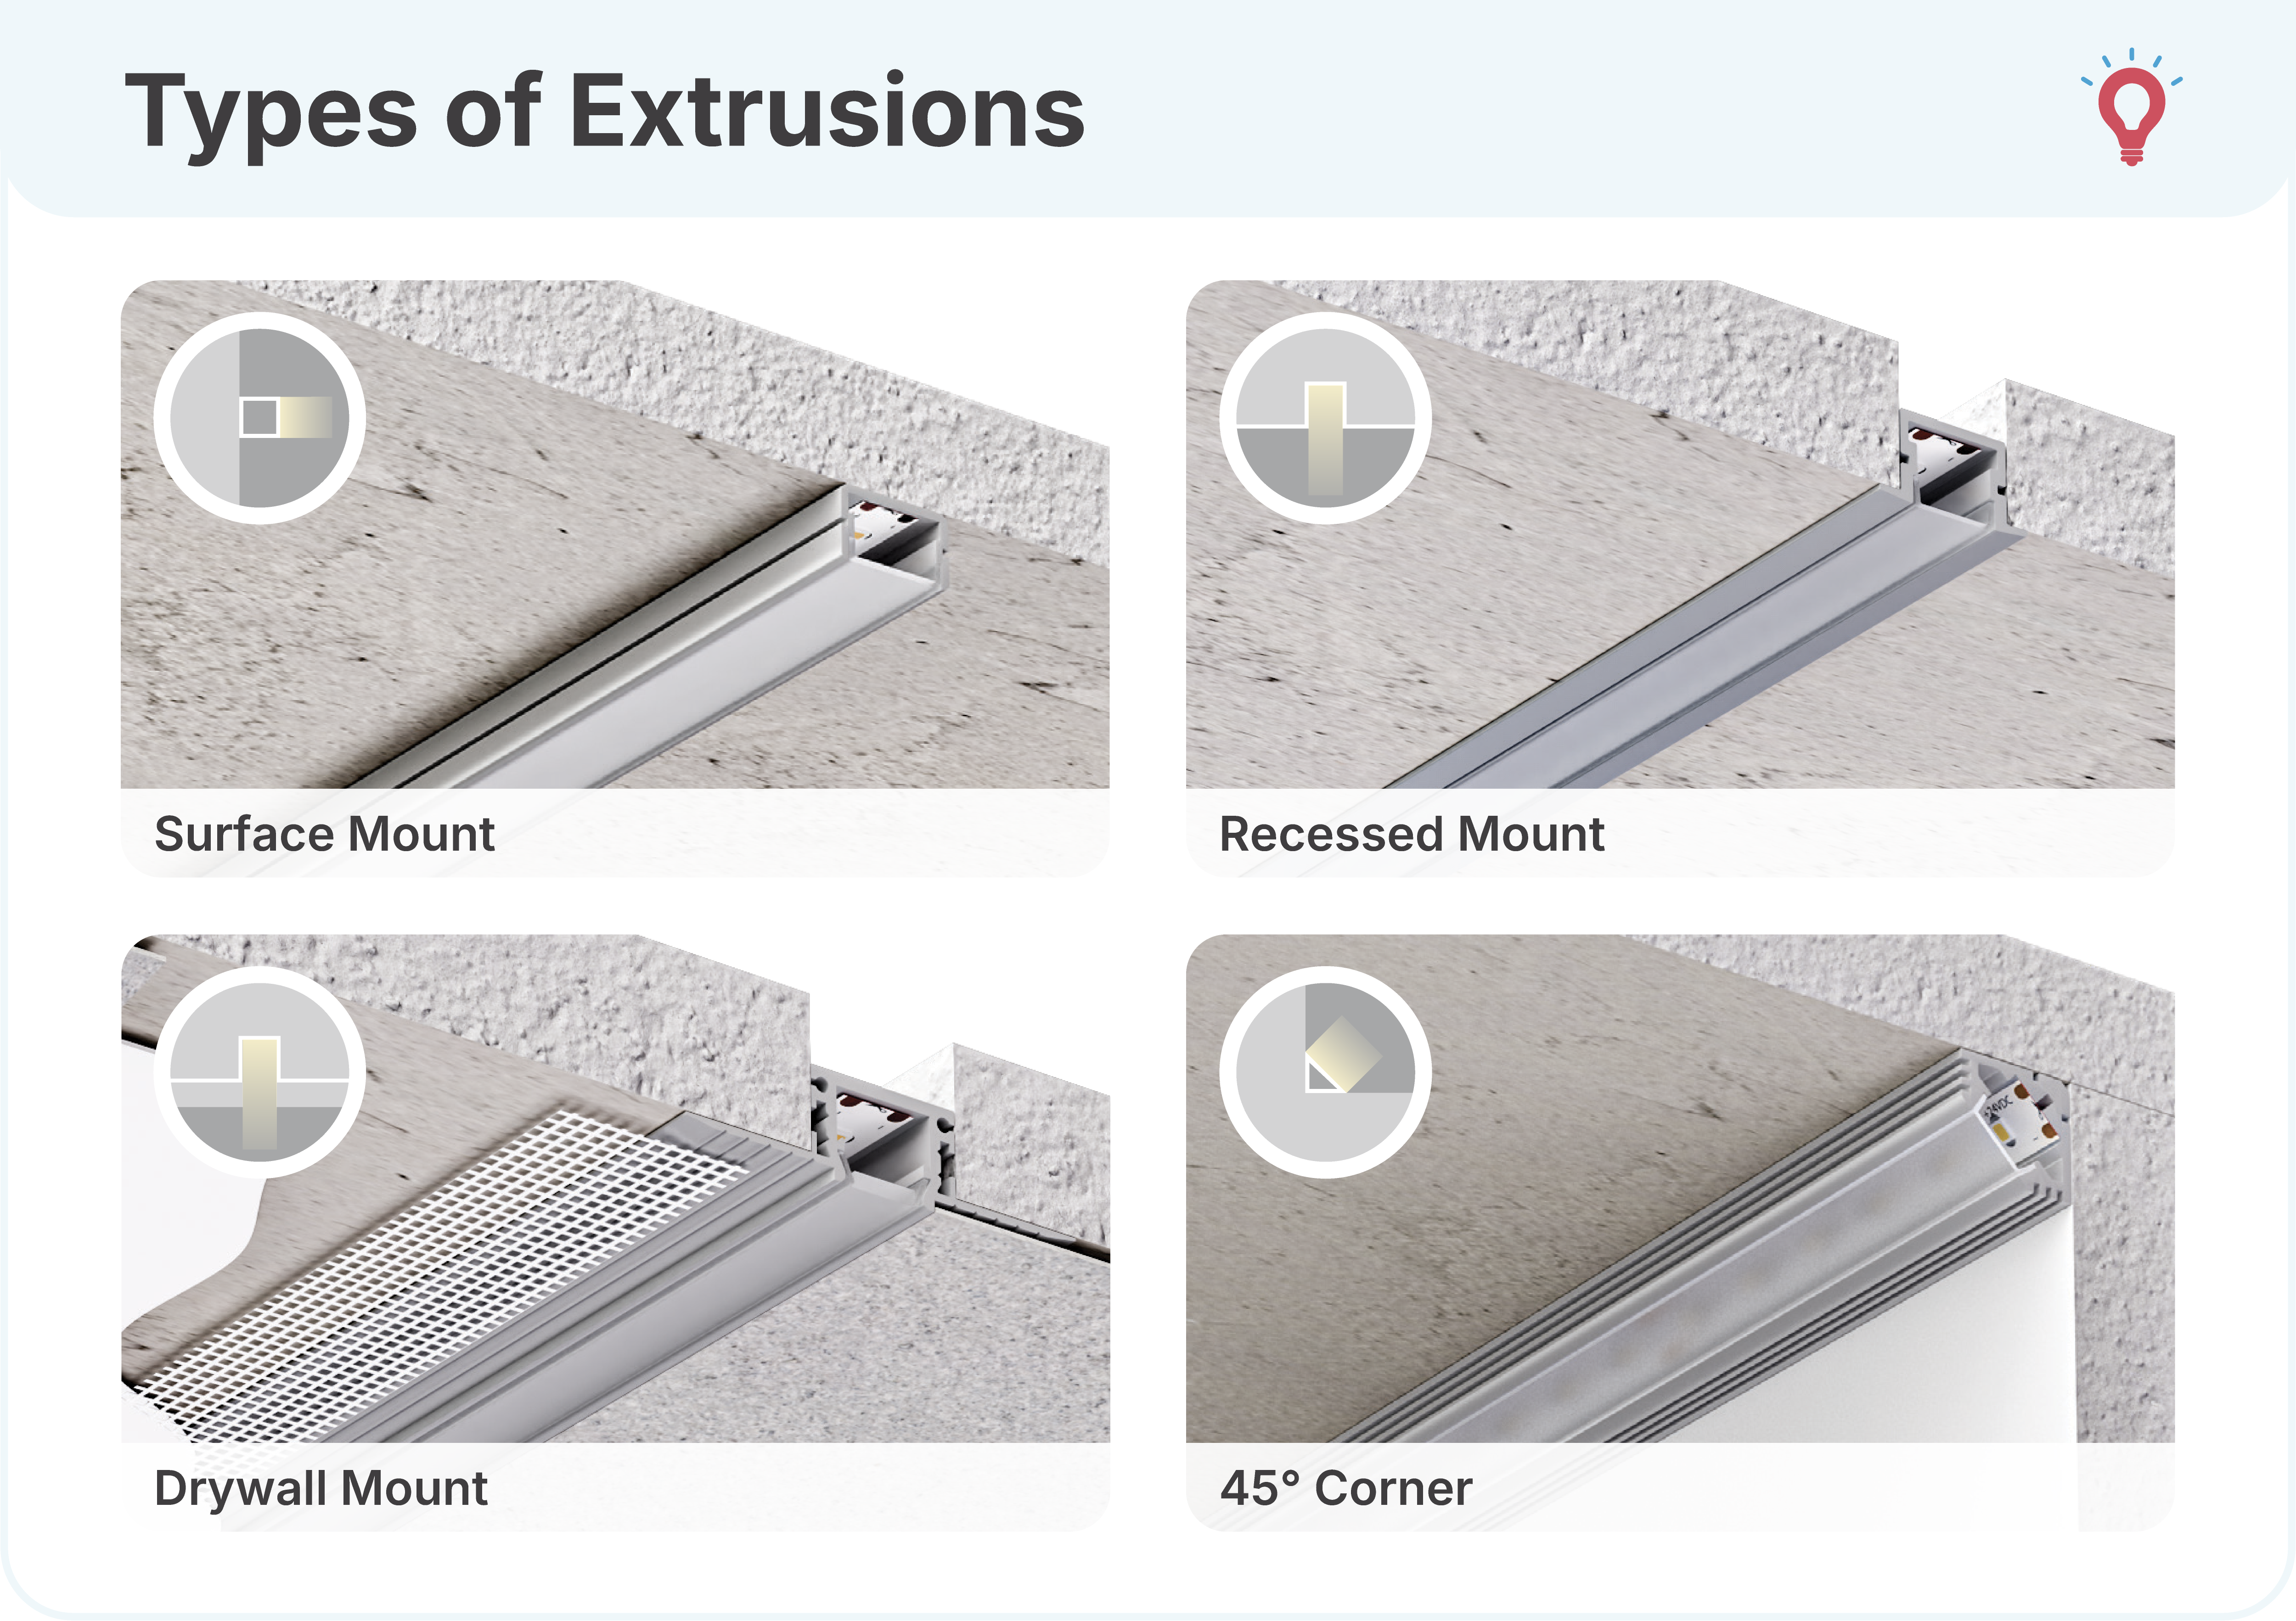
Aluminum Channel (Optional but Recommended):
Choose one style based on your preference:
- Surface Mount 48″ Channel – Qty: 4 pieces (covers 14 feet with margin)
DiodeLED S1 Mounting Channel – Classic Frosted Lens
- Recessed Mount 48″ Channel – Qty: 4 pieces
OR
- 45° Angled Surface Mount 4ft Channel – 1 pack (10-pack, use 4 pieces)
Your Project May Differ If:
- Tape light runs are longer/shorter than our example
- Using multiple power supplies instead of one
- Driver location requires longer wire runs
- Installing in wet locations
- Complex layouts need additional connectors
PRO Tips:
- Buy extra connectors and tape light for errors, project adjustments
- Verify all components match your voltage (12V or 24V)
- Check local codes for hardwired installations
- Consult a licensed electrician for installation if you’re unsure about any electrical work
Common LED Tape Light Mistakes to Avoid
Avoid these common errors that cause LED tape light projects to fail:
- Exceeding maximum run length – Always check the spec sheet for your specific tape
- Undersizing the power supply – Add that 20% buffer to calculated wattage
- Wrong IP rating – Dry-rated products in wet locations fail quickly (safety concern)
- Mixing voltage systems – Never connect 12V tape to 24V driver or vice versa
- Skipping aluminum channel – Adhesive eventually fails; channels prevent this and extend LED life
- Poor surface prep – Won’t stick to dust, oils, or textured surfaces
- Using wrong connectors – Always use manufacturer-recommended connectors for your tape width
- Ignoring voltage drop – Long wire runs cause dimming at the far end
- Not testing before final install – Always test the complete system before permanent mounting
Frequently Asked Questions
How long does LED tape light last?
Quality LED tape light lasts 50,000 hours (15-20 years at 8 hours/day). Aluminum channels act as heat sinks, extending lifespan through better thermal management.
Can I use a regular dimmer with LED tape light?
No. You need an LED-compatible dimmer and compatible dimmable power supply.
Standard dimmers cause flickering. They can also damage the driver.
What’s the difference between flexible LED tape light and LED strips?
Flexible tape bends around curves. You can cut it to custom lengths. Rigid LED strips have set fixture lengths, like shop lights.
Do I need a professional for installation?
Many DIY-friendly installations are manageable for homeowners. This typically includes runs under 30 feet with plug-in power.
You may need an electrician for complex projects. This includes hardwired installations, commercial applications or other advanced tape light projects.
Can I use LED tape light outdoors?
Yes, but you need waterproof LED tape light. Standard indoor LED tape light will fail quickly when exposed to moisture. For permanent outdoor LED tape light installations, choose IP67-rated products and use weatherproof power supplies. All connections must be sealed with waterproof connectors or heat shrink tubing. Consider consulting an electrician for outdoor tape light installations.
Do I need special connectors for LED tape light?
Yes, LED tape light connectors are specifically designed for the width and voltage of your tape. Solderless LED connectors are the easiest option for DIY installation, available in strip-to-wire, strip-to-strip, and corner configurations. Always match connector width (8mm, 10mm, etc.) to your specific LED tape light product.
Ready to Start Your LED Tape Light Project?
You now have everything needed to successfully plan and install your LED tape light project. From calculating LED tape light power supply requirements to selecting the right voltage and IP rating for outdoor LED tape light or under cabinet LED lighting, this guide covers every decision point for professional results.
Need Help Choosing the Right Components?
Our lighting experts are here to help. Whether you’re tackling a DIY kitchen upgrade or planning a complex commercial installation, we’ll guide you to the perfect LED tape light solution.
Shop LED Tape Light Now | Contact Our Experts

Browse by Application:
Shop by Brand:
American Lighting | Diode LED | Lotus LED Lights | RAB Lighting
PROLIGHTING is a trusted lighting distributor serving contractors, designers, DIYers, and facility managers nationwide. We carry professional-grade LED tape light solutions from leading manufacturers with expert technical support and fast shipping.


Comments are closed.